
Manual Image Tagger
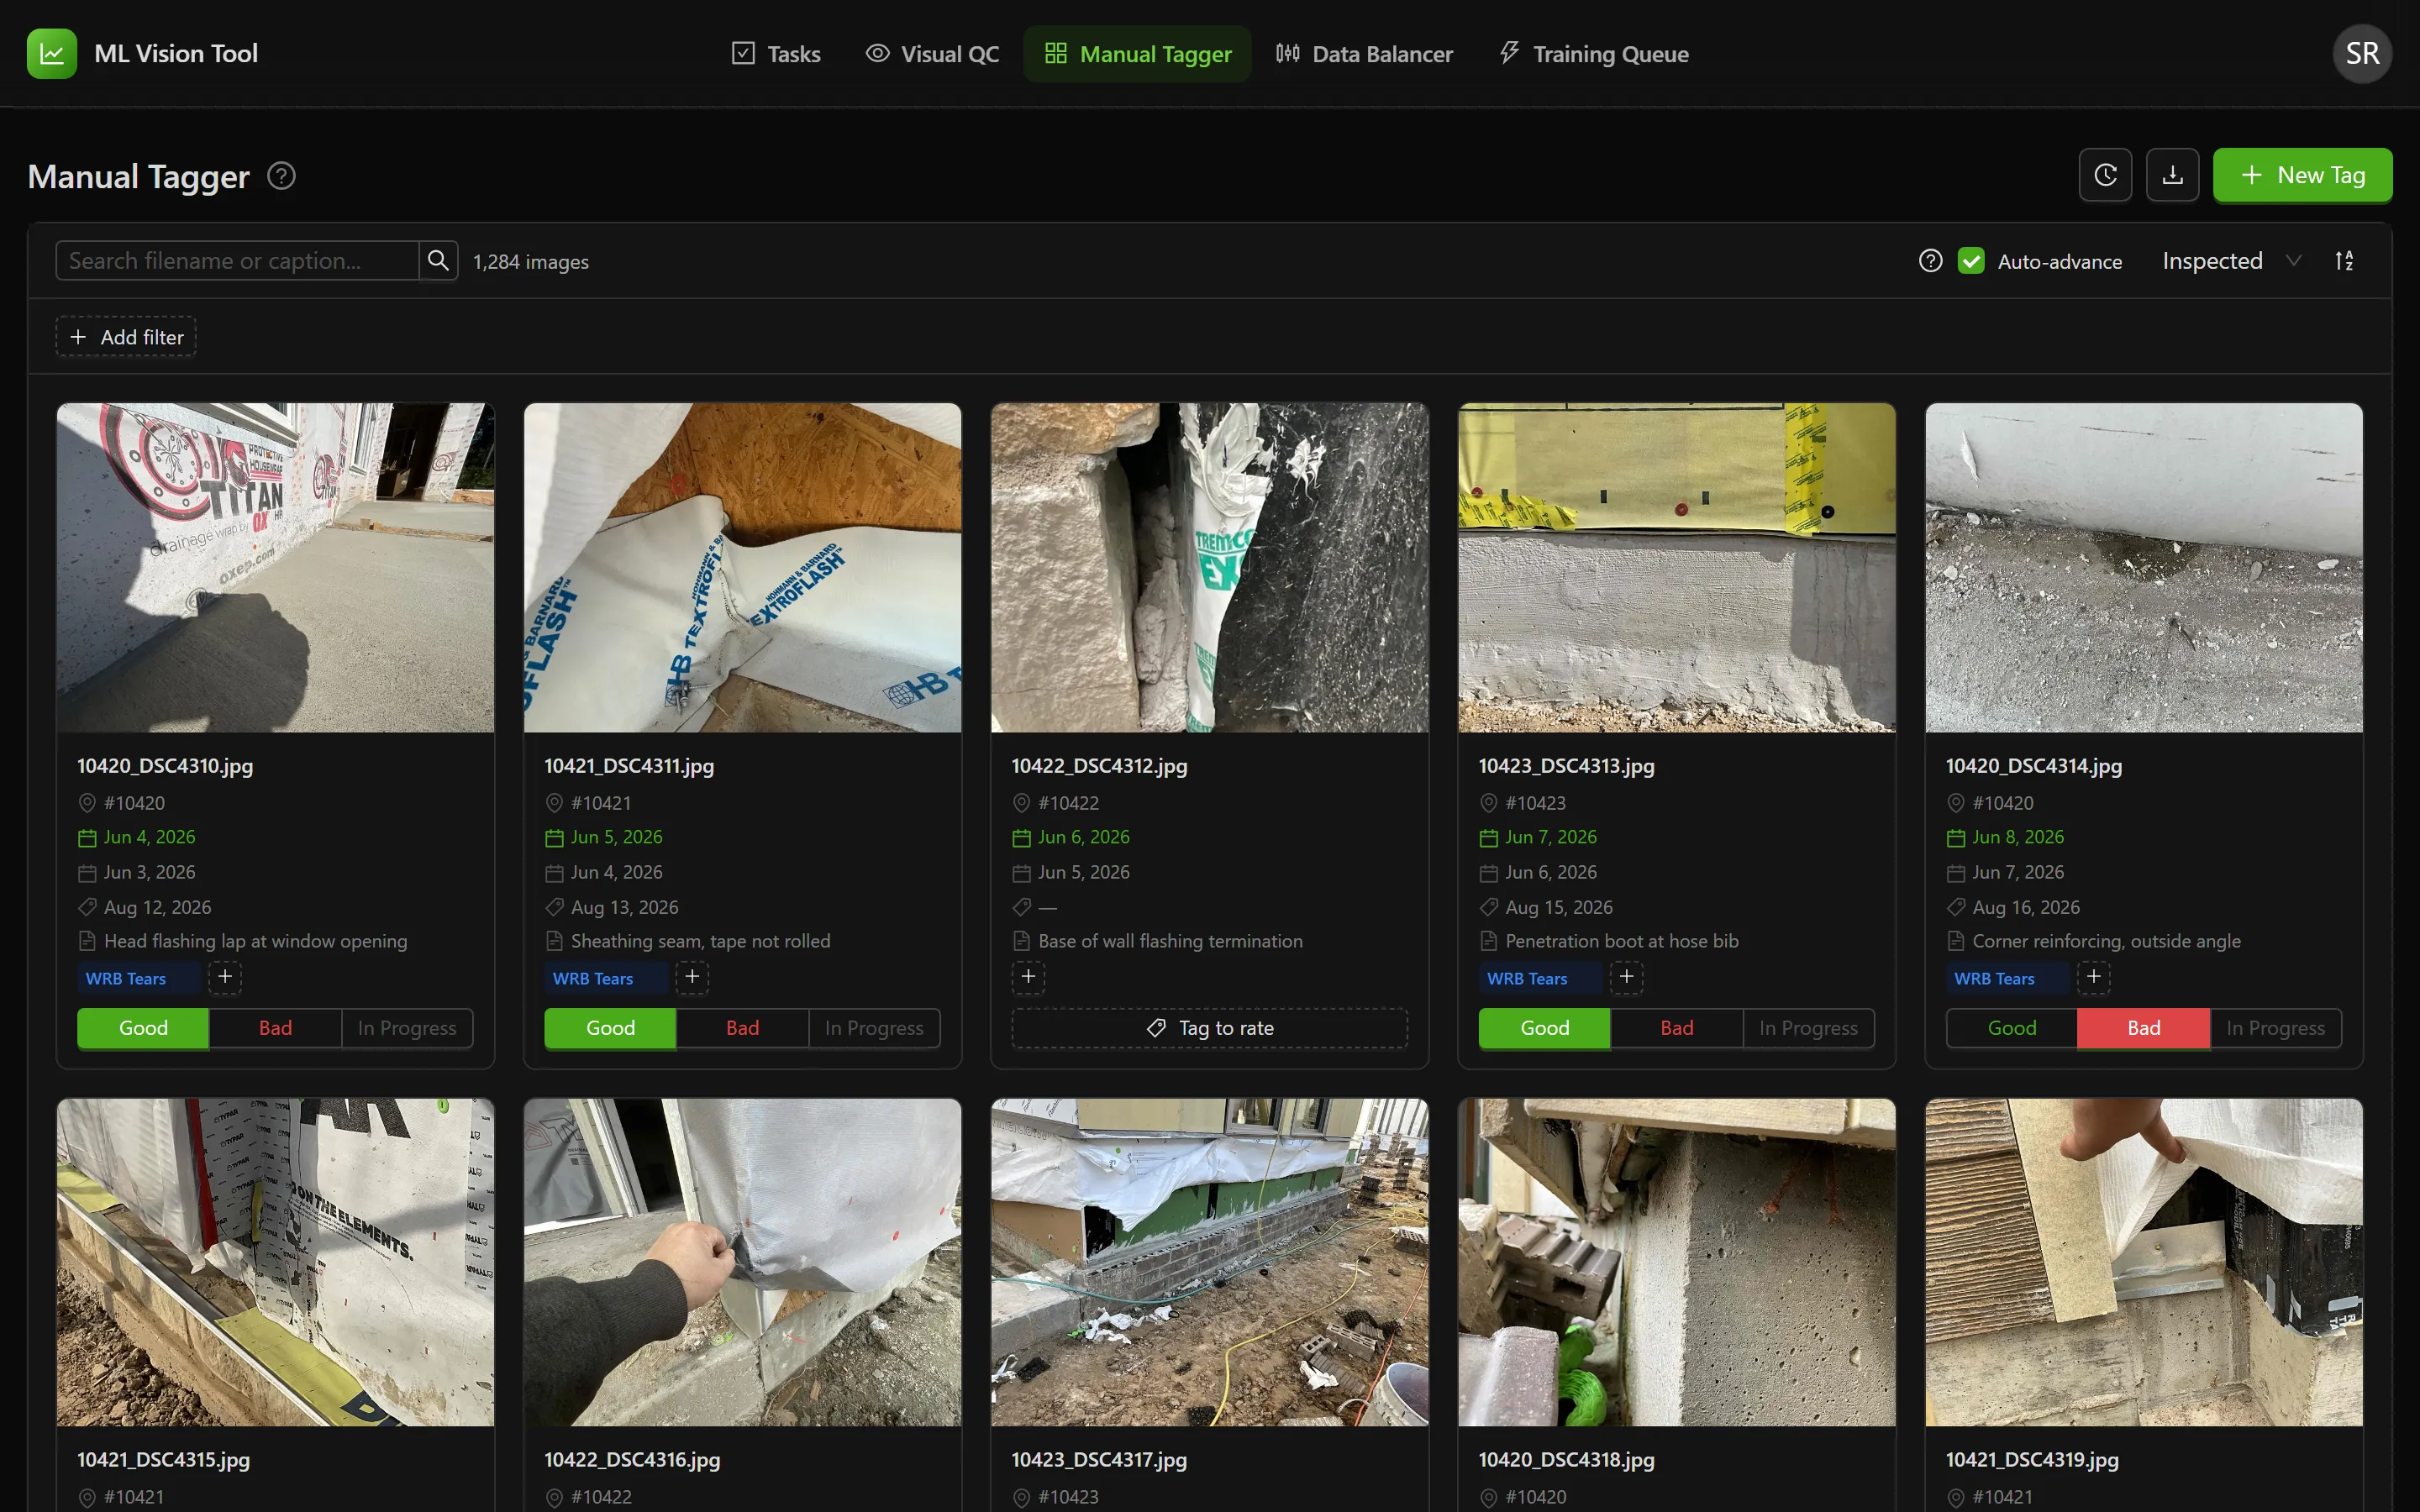
The Manual Tagger is where inspection photos are labelled and rated to build AI training datasets. Filter the corpus down to the photos you want, apply tags, rate each photo against a tag, and export a curated training set. This article is for anyone doing that tagging work.
Opening the Manual Tagger
Section titled “Opening the Manual Tagger”- Sign in to the ML Vision Tool. The home page reads “Choose a tool to get started”.
- Select the Manual Tagger card, or Manual Tagger in the top navigation bar.
The page header carries three controls: an Activity log button, a Download training images button, and New Tag. Below them sits the toolbar, and below that the photo grid — newest first.
There is a third way in. Where the work has been posted as a tagging task on the Task Board, selecting Open on that task brings you here. It opens the tagger unfiltered — the tag on a tagging task describes what to go and collect, not a slice to browse — so apply the filters yourself.
Finding Photos
Section titled “Finding Photos”Searching
Section titled “Searching”The search box matches on filename or caption. Its placeholder reads “Search filename or caption…”. Matches are highlighted on each card. There is no search button — results refresh shortly after you stop typing.
Filters
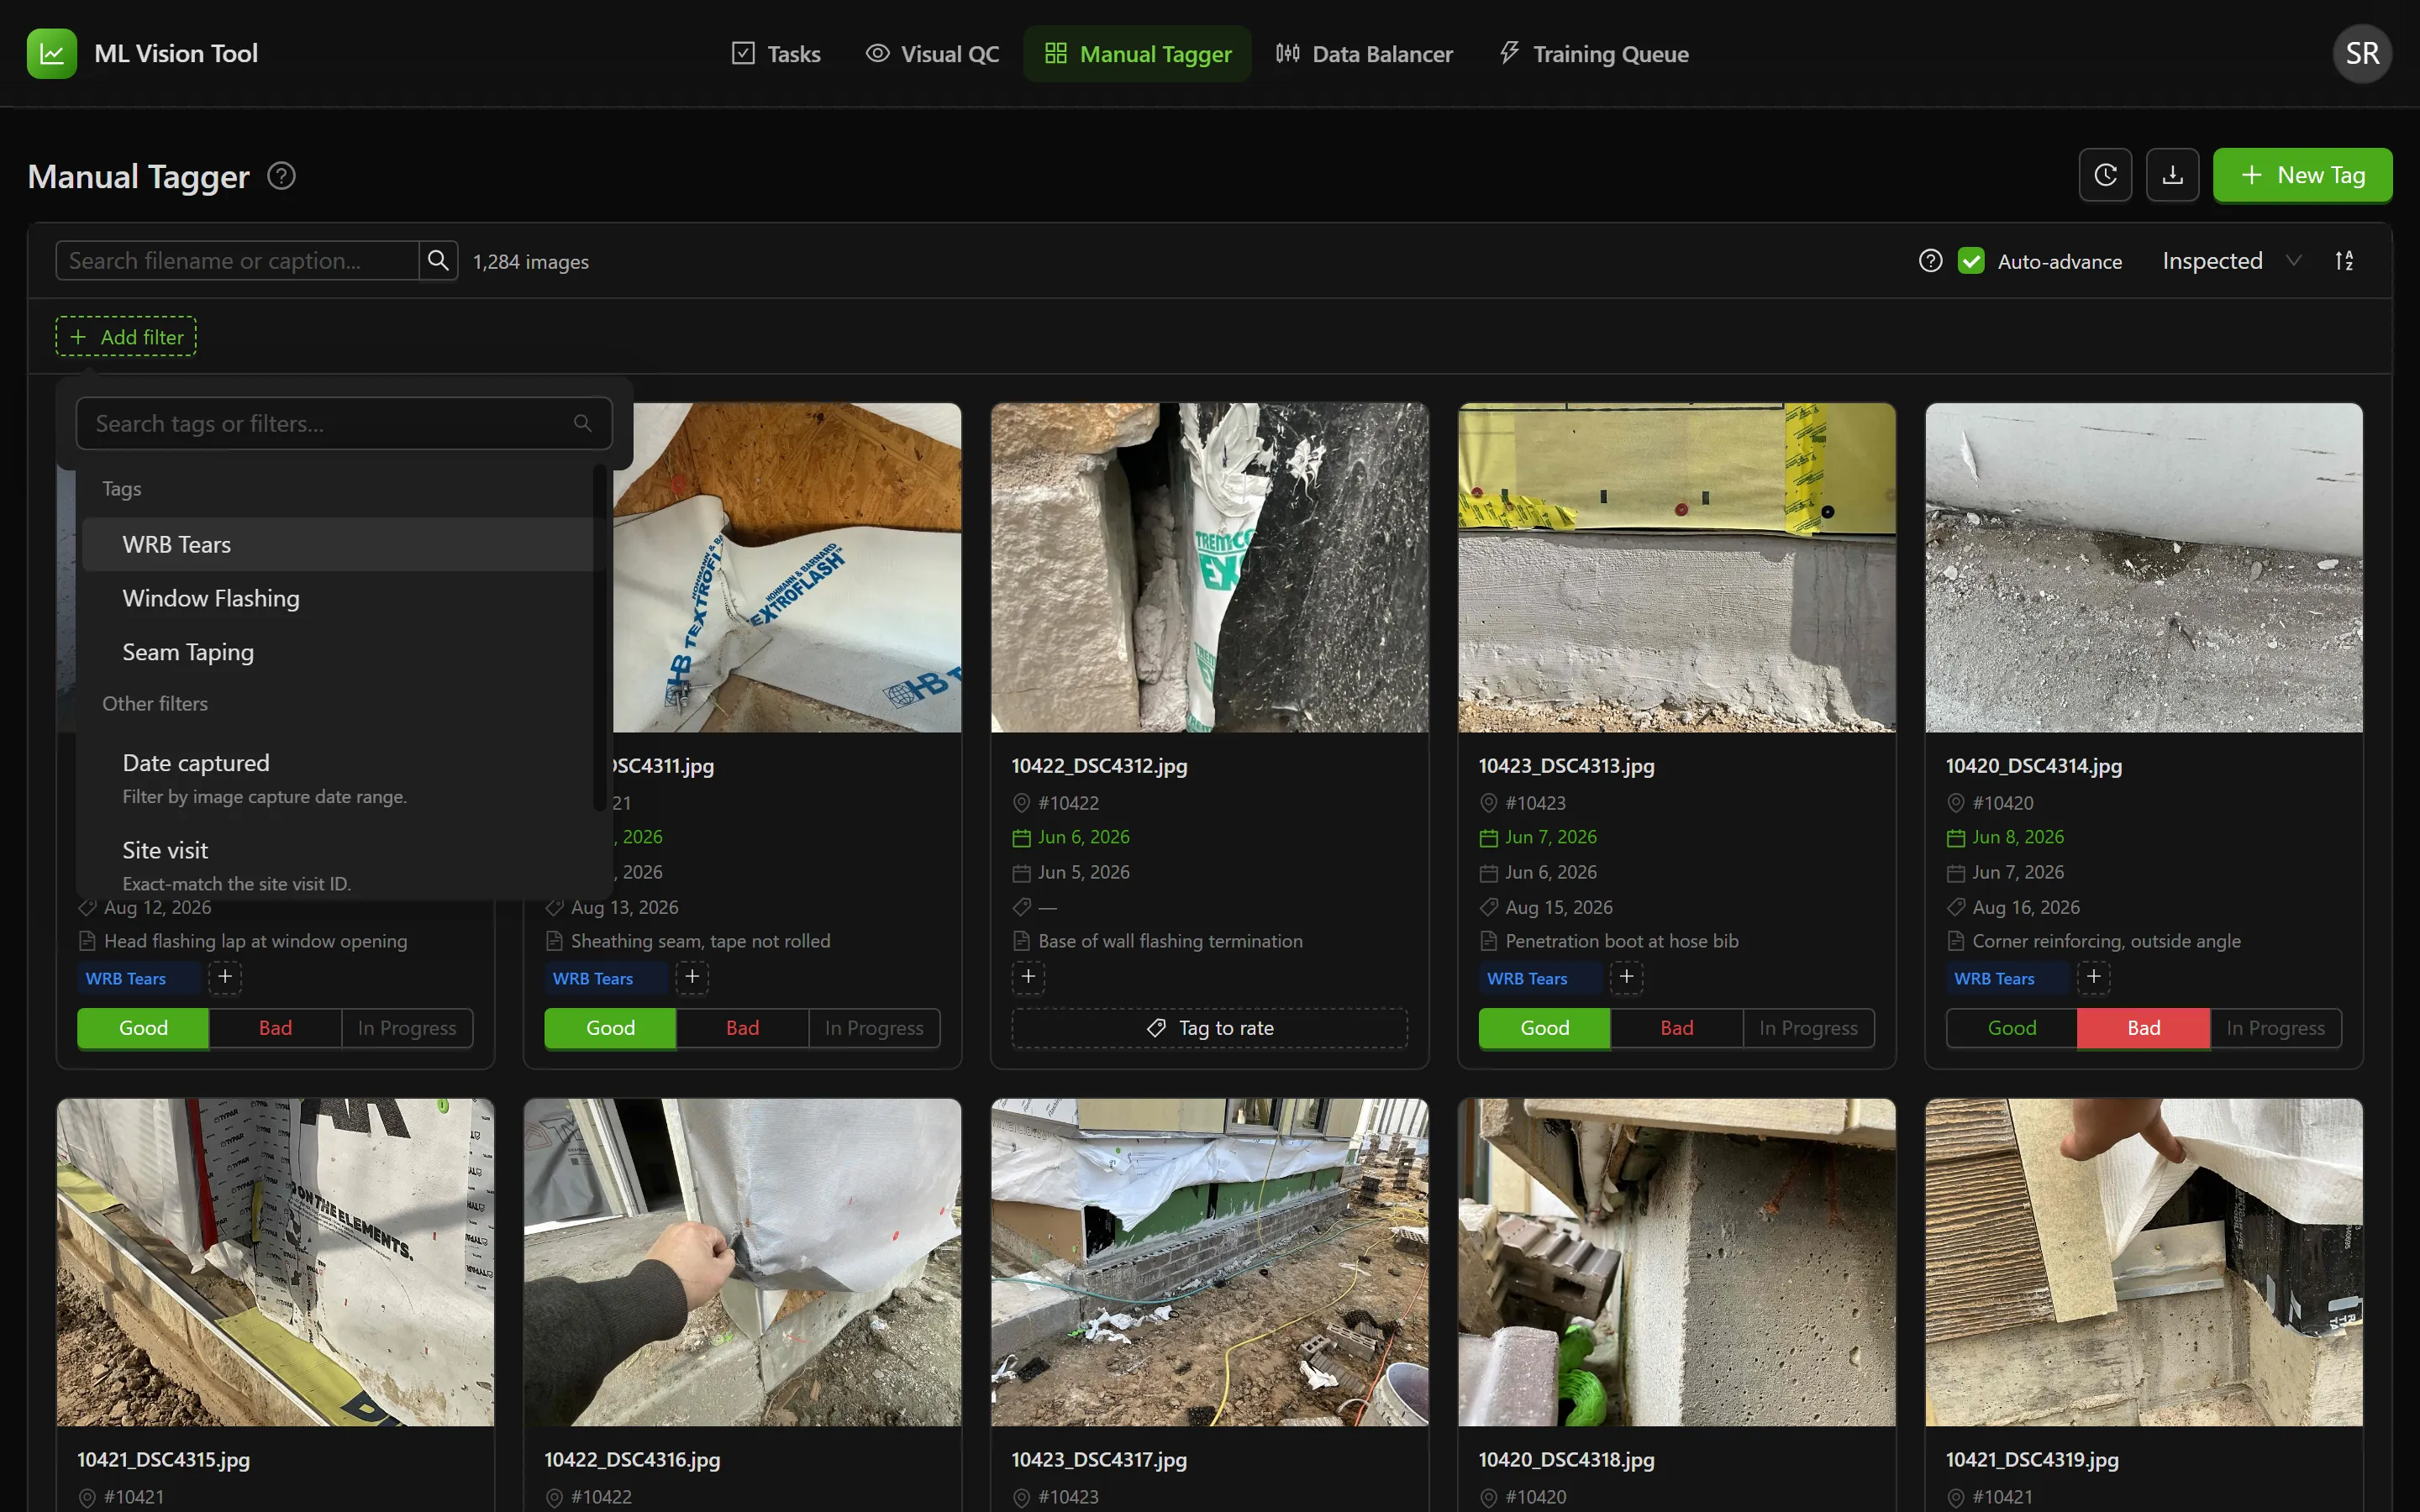
Section titled “Filters”Everything else is a chip. Select Add filter to open the picker, which searches with “Search tags or filters…” and groups its options under Tags and Other filters. Each choice becomes a chip you can select again to edit, or dismiss to clear.
| Filter | What it does | Notes |
|---|---|---|
| Date captured | “Filter by image capture date range.” | Presets: Last 7 days, Last 30 days, Last 3 months, This year. The end day is included in full. |
| Date tagged | “Filter by when the image was tagged with any selected tag.” | Available only while at least one tag is selected. |
| Site visit | “Exact-match the site visit ID.” | Exact match, not partial. Example placeholder: “e.g. 32777”. |
| Building | “Match building name (partial).” | Partial match, case-insensitive. Example placeholder: “e.g. Tower A”. |
| Rating | “Show images with this rating for any selected tag.” | Good, Bad, In Progress or Unrated. Available only while at least one tag is selected. |
Selecting several tags returns photos carrying any of them, not all of them — the picker heading changes to Tags — image has any (OR) to say so. Past three tag chips the rest collapse behind +{n} more. With no tag selected at all, the grid shows the whole corpus, which is how you find untagged photos.
How many photos match
Section titled “How many photos match”Beside the search box, a count reads “N images” for the filter you have set. Some filters cannot be counted without paging the whole corpus; those show “N+ loaded” instead, meaning how many have arrived so far rather than how many exist. The tooltip says so: “This filter cannot be counted without paging the whole corpus, so this is how many have loaded so far.”
This count is how you size up what is left to do. Filter to one tag, add Rating, and choose Unrated — the number is the outstanding work for that tag. It is the method described in Task Board for tracking a tagging task, which has no progress bar of its own.
Sorting
Section titled “Sorting”Sort by Inspected (the default), Site Visit, Filename or Captured. A fifth option, Tagged, appears only while at least one tag is selected. The button beside the list reverses the direction.
Loading more photos
Section titled “Loading more photos”The grid loads the next photos as you approach the bottom. A Load more button is also there for keyboard and screen-reader use. When everything is loaded the footer reads “All {n} images loaded”, or “{n} images loaded” where the exact total is not known.
If a page fails to load, automatic loading stops and the grid shows “Couldn’t load more images.” with a Retry button. Automatic loading does not resume until you select Retry.
Tagging Photos
Section titled “Tagging Photos”One photo at a time
Section titled “One photo at a time”- Point at a photo card. A dashed + button appears beside its tag chips.
- Select it to open the tag list, which searches with “Search tags…”.
- Tick every tag you want, then select Apply {n} tags.
Unticking a tag you previously applied removes it straight away. Tags that came from the source inspection data carry a lock icon and cannot be removed here.
Quick-tagging from the keyboard
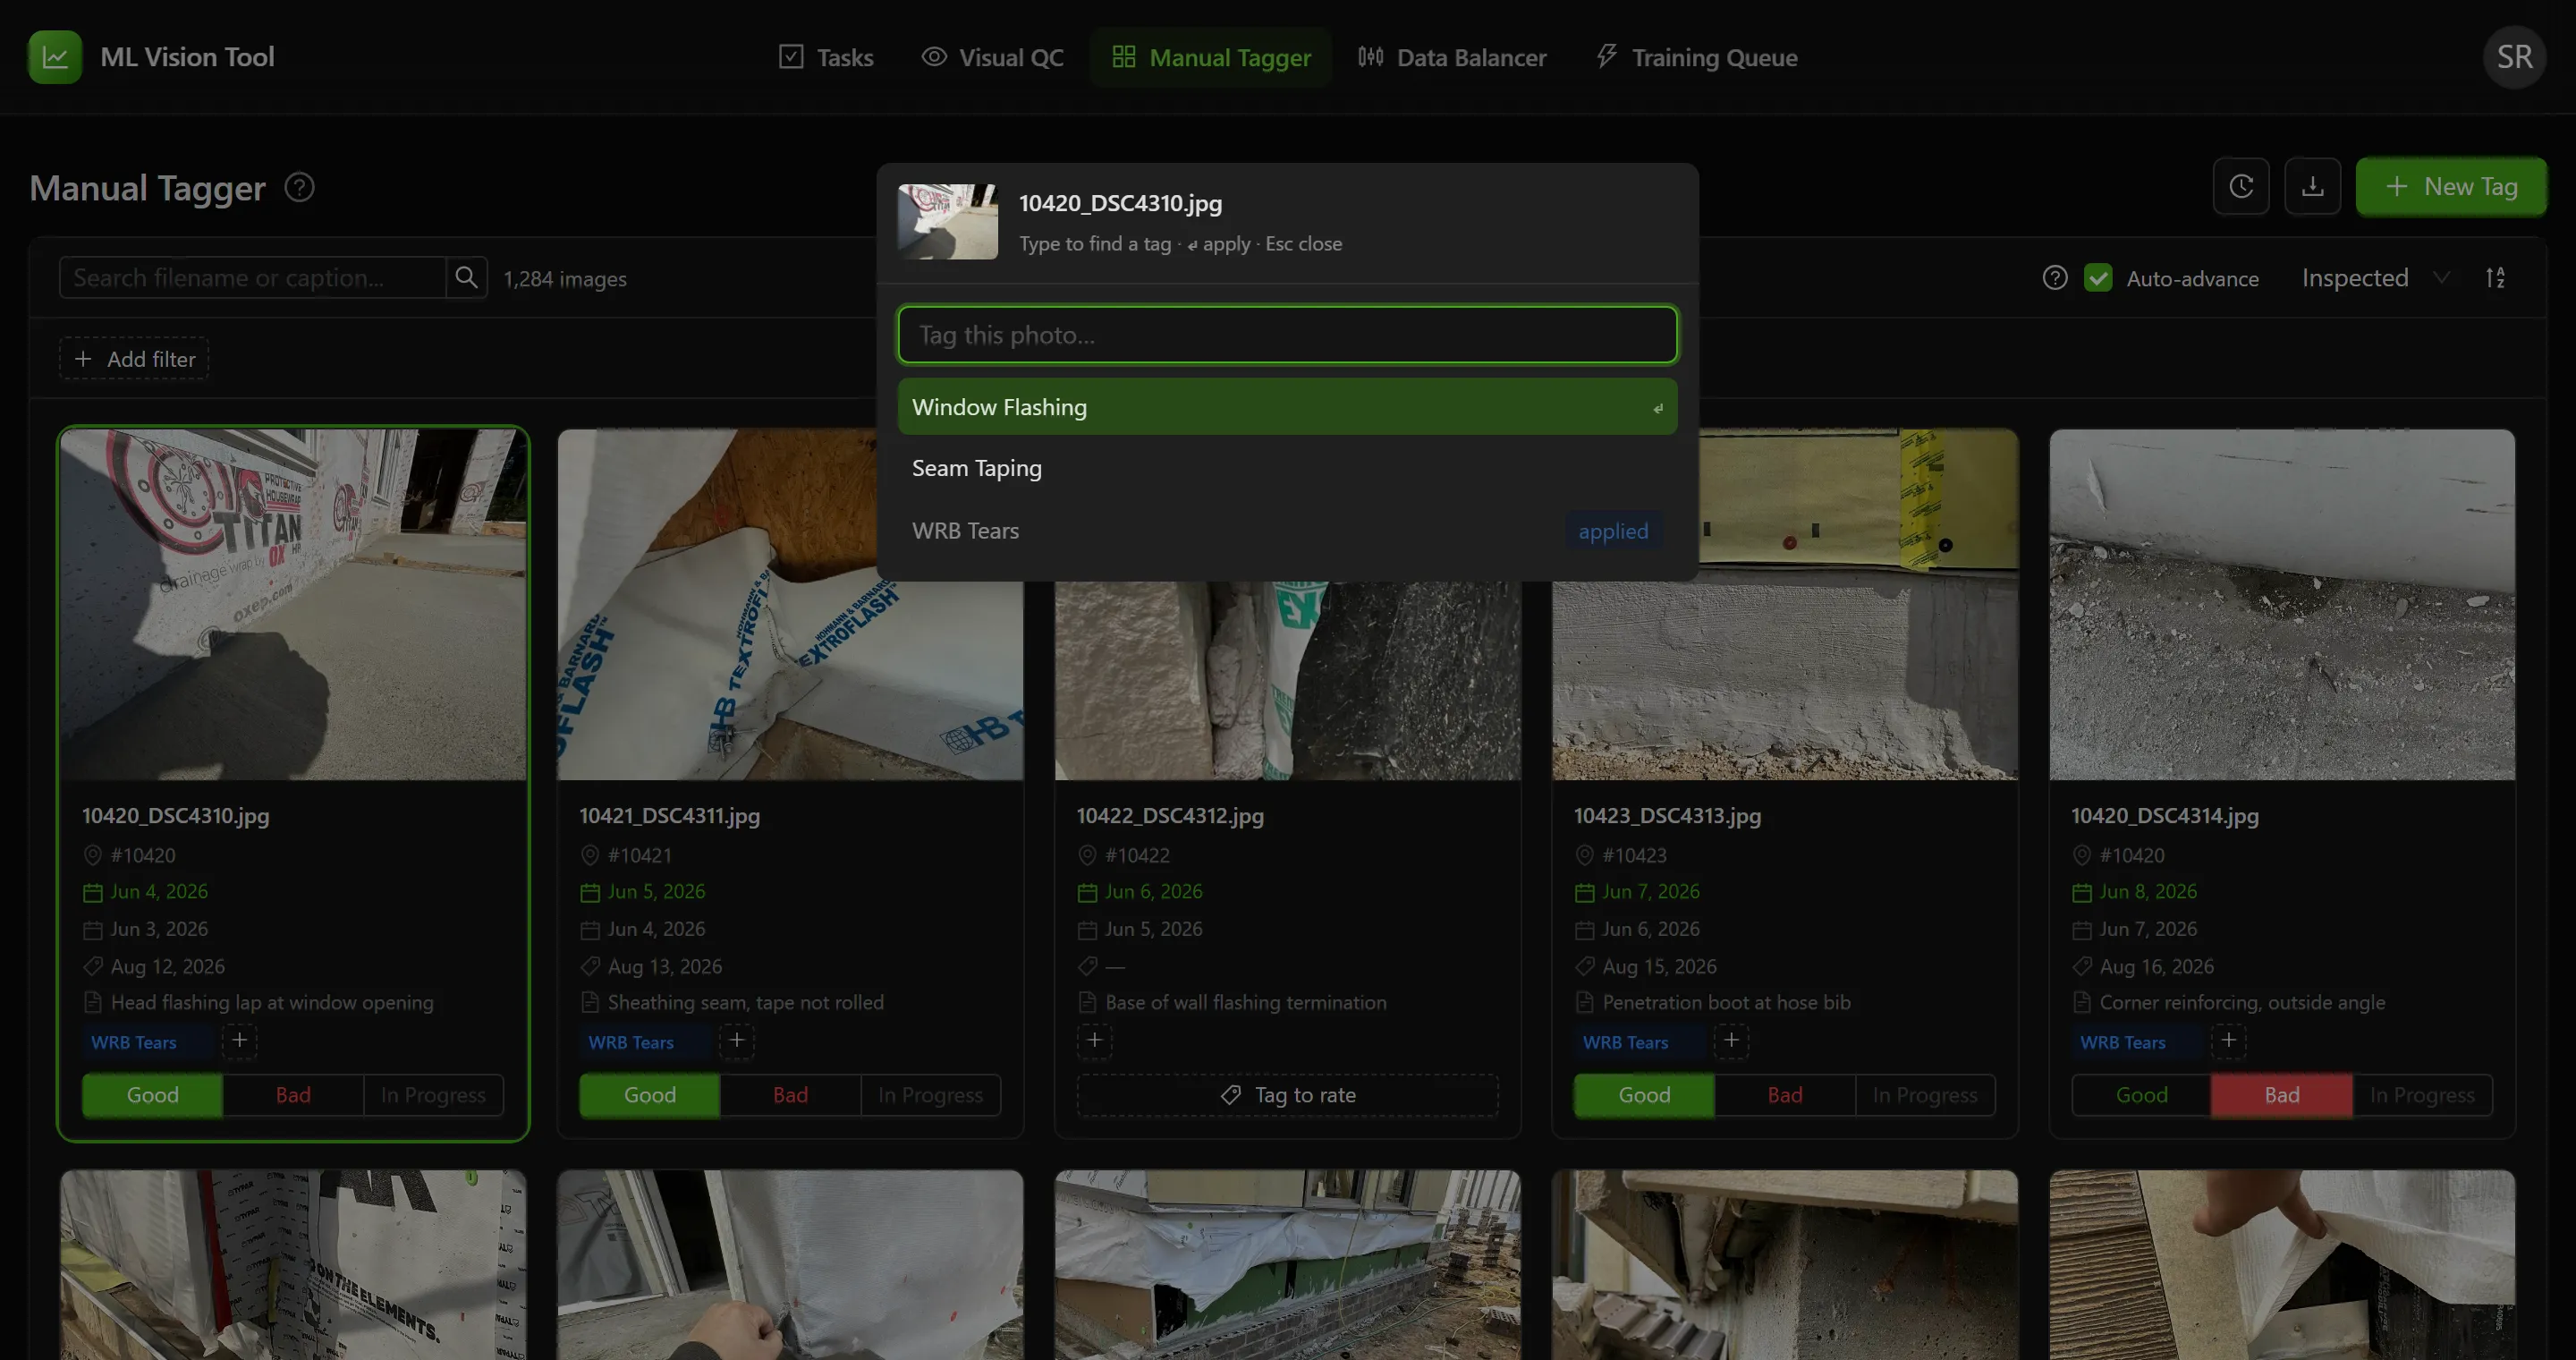
Section titled “Quick-tagging from the keyboard”With a card focused, press T. A search box opens over the photo, hinted “Tag this photo…” and “Type to find a tag · ↵ apply · Esc close”. Move with the arrow keys and press Enter to apply. Tags already on the photo sink to the bottom marked applied and cannot be picked again.
The box stays open after applying, so several tags can be added in a row. Tagging never advances to the next photo.
Many photos at once
Section titled “Many photos at once”- Select photos by choosing their cover, their checkbox, or pressing X on the focused card. Hold Shift while selecting to take a range.
- In the bar that appears along the bottom, pick a tag under “Tag to apply…”.
- Select Tag.
The bar counts the selection as {n} selected. Clear drops the selection without changing anything. If every selected photo already carries the tag, nothing is written and the message reads “All selected images already have this tag”.
Removing a tag
Section titled “Removing a tag”Point at any tag chip on a card and choose the × that appears. A message reads “Removed” with the tag name and offers Undo for about five seconds.
Rating Photos
Section titled “Rating Photos”A rating belongs to a photo and a tag together, not to the photo alone. The same photo can be Good for one tag and Bad for another. The three buttons at the bottom of a card always act on that card’s active tag — the chip shown filled and bold. Choose a different chip to switch which tag you are rating.
| Rating | Use it when |
|---|---|
| Good | The photo clearly shows the tagged condition and belongs in training. |
| Bad | The photo is blurred, mislabelled, or does not show the condition. |
| In Progress | You are unsure and want to come back to it. |
Unrated is a filter, not a button — there is no way to clear a rating back to it. Choosing the rating a photo already has changes nothing.
A photo with no tags cannot be rated
Section titled “A photo with no tags cannot be rated”Where a photo carries no tags, the rating buttons are replaced by a dashed Tag to rate button, explained as “Ratings apply to a defect tag. Add a tag to rate this photo.” Pressing a rating key on such a photo shows “Tag this photo first to rate it (press T)” instead.
Rating many photos at once
Section titled “Rating many photos at once”Select the photos, then choose Good, Bad or In Progress in the bottom bar.
Reviewing One Photo Closely
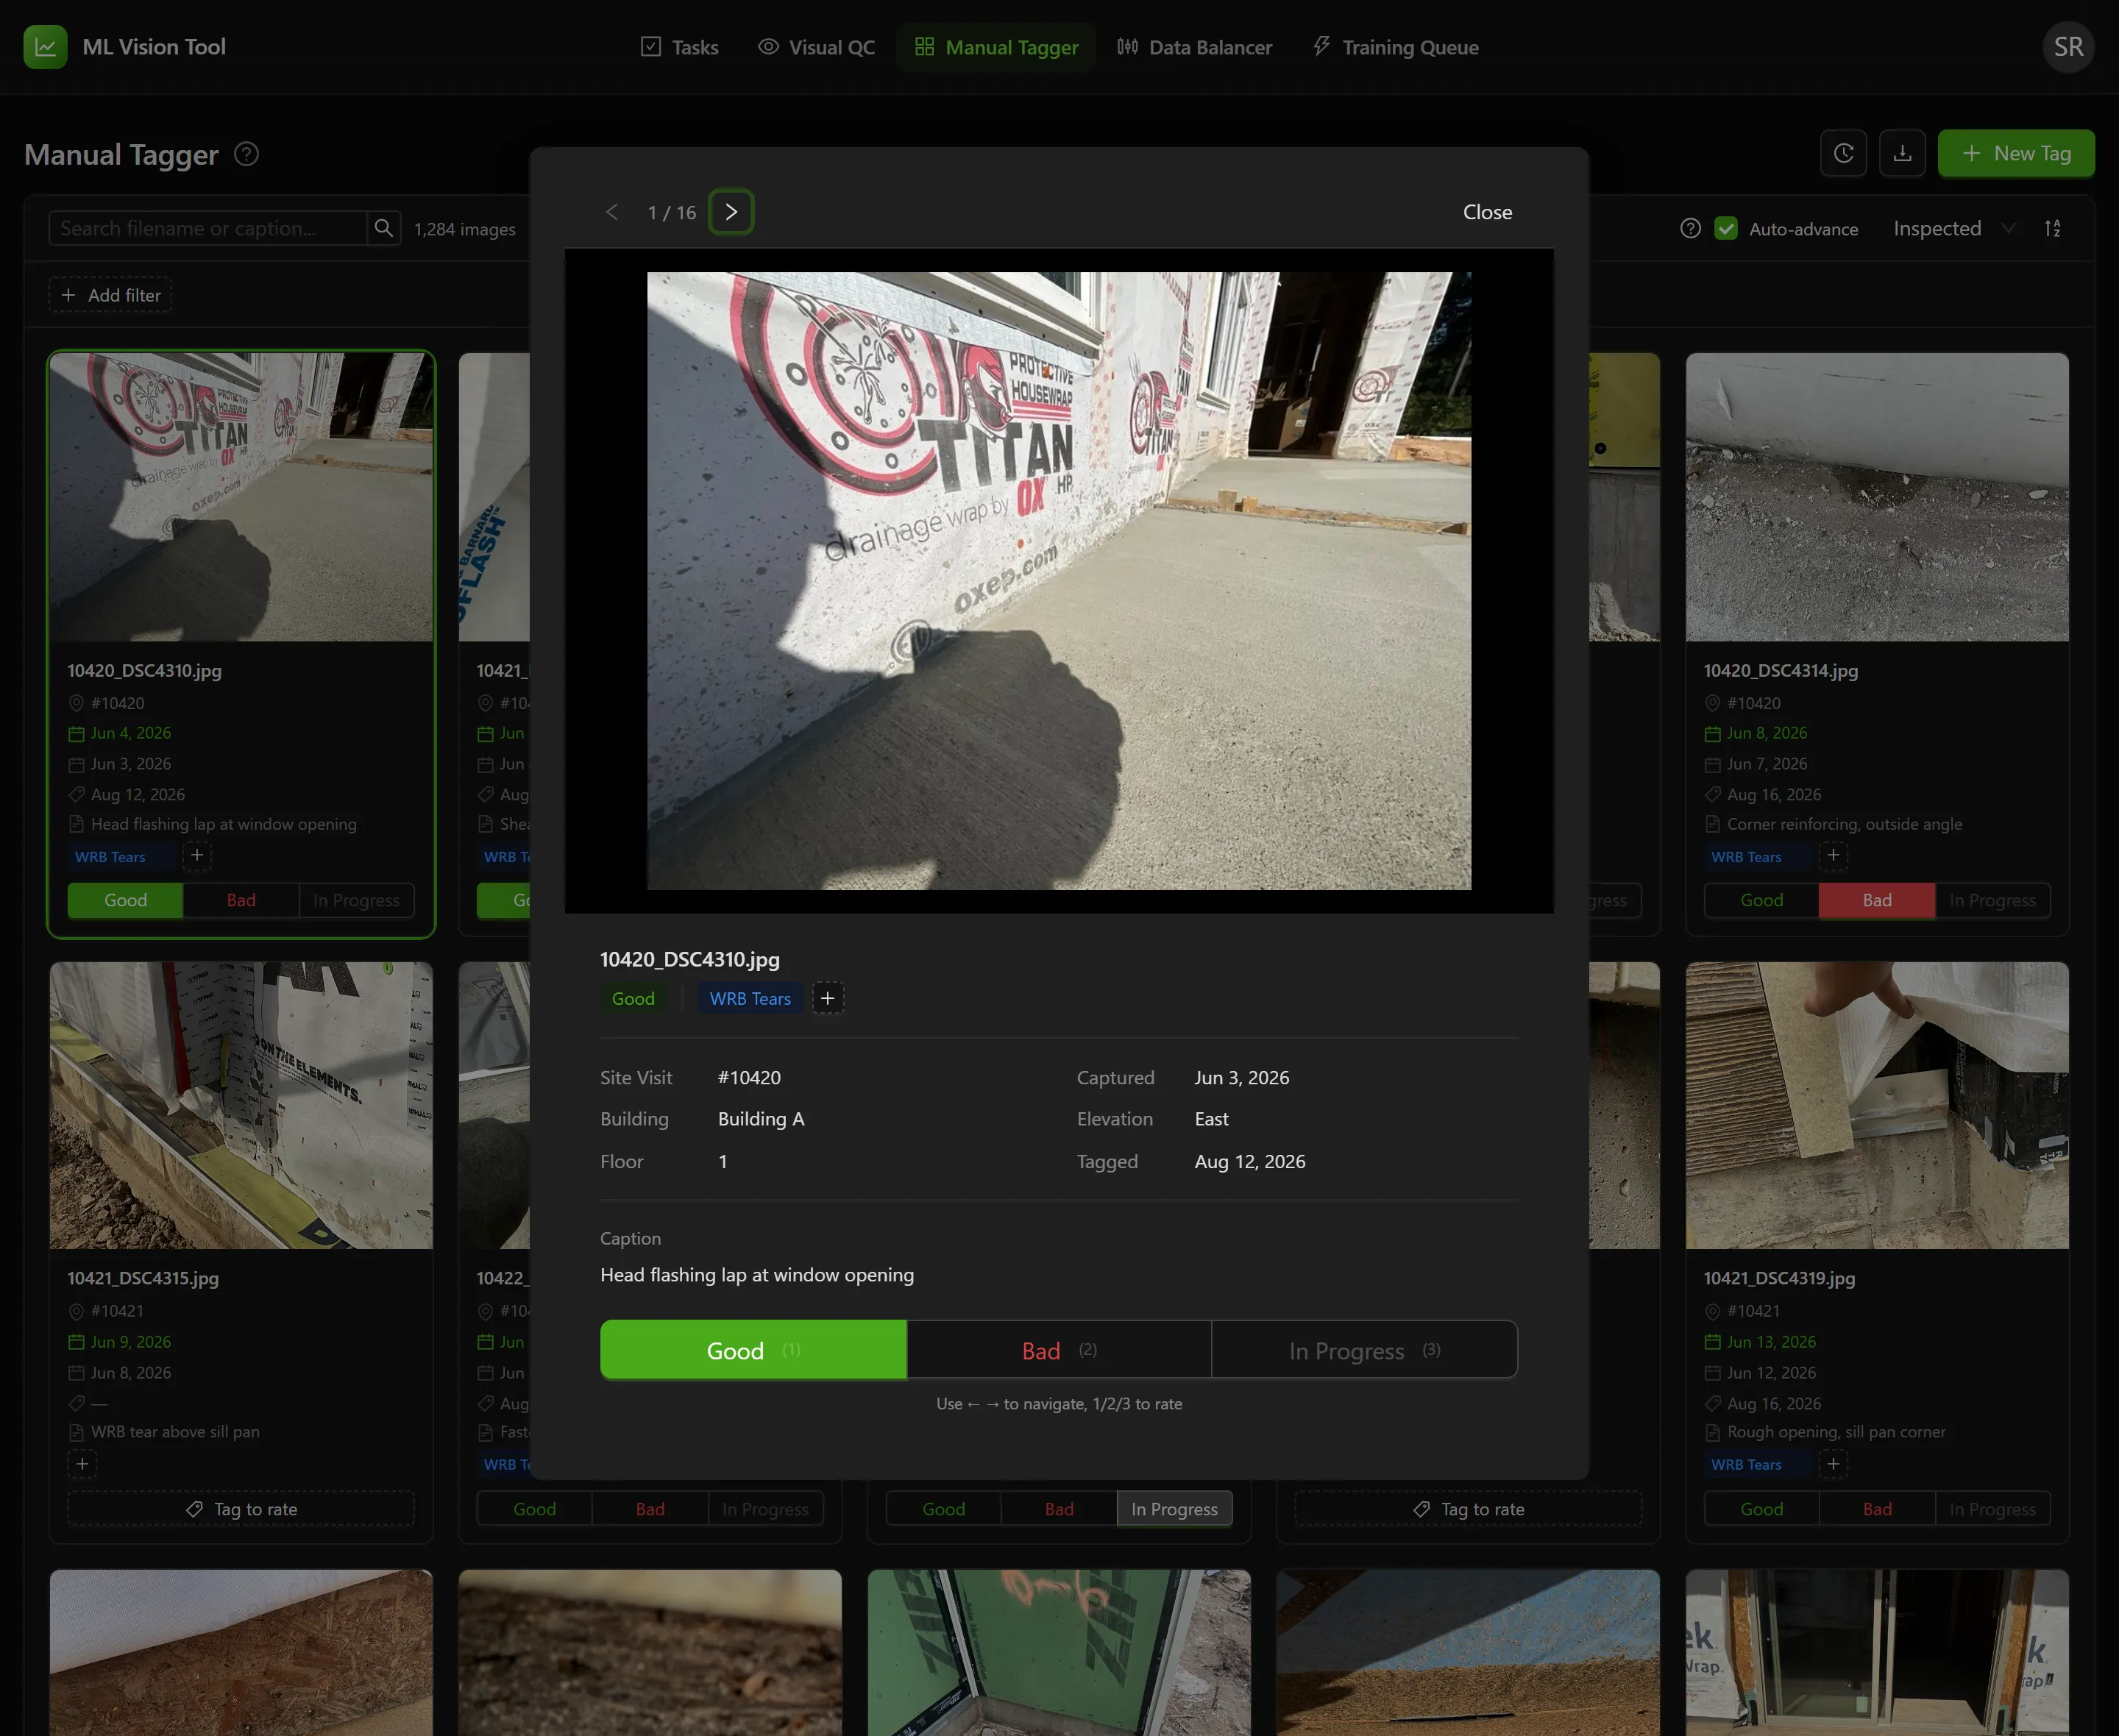
Section titled “Reviewing One Photo Closely”Point at a card and choose the eye icon to open the photo full size. The dialog shows a counter, a Close button, the tag chips with a + to add more, and a detail panel: Site Visit, Captured, Building, Elevation, Floor, Tagged, and Caption. Anything the record does not hold shows as a dash. Where the active tag has no rating yet, it is marked Unrated.
Use the left and right arrow keys to move between photos and 1, 2, 3 to rate — the footer repeats this as “Use ← → to navigate, 1/2/3 to rate”. Reaching the end of what is loaded fetches the next photos and carries on.
The clock icon on a card opens its History: every Tagged, Untagged and Rated event for that photo across all tags, each with the tag, the time, and who did it. Rating changes show as a transition, such as Bad to Good. A long history is trimmed, noted as “Showing latest {n} of {n}”.
Keyboard Shortcuts
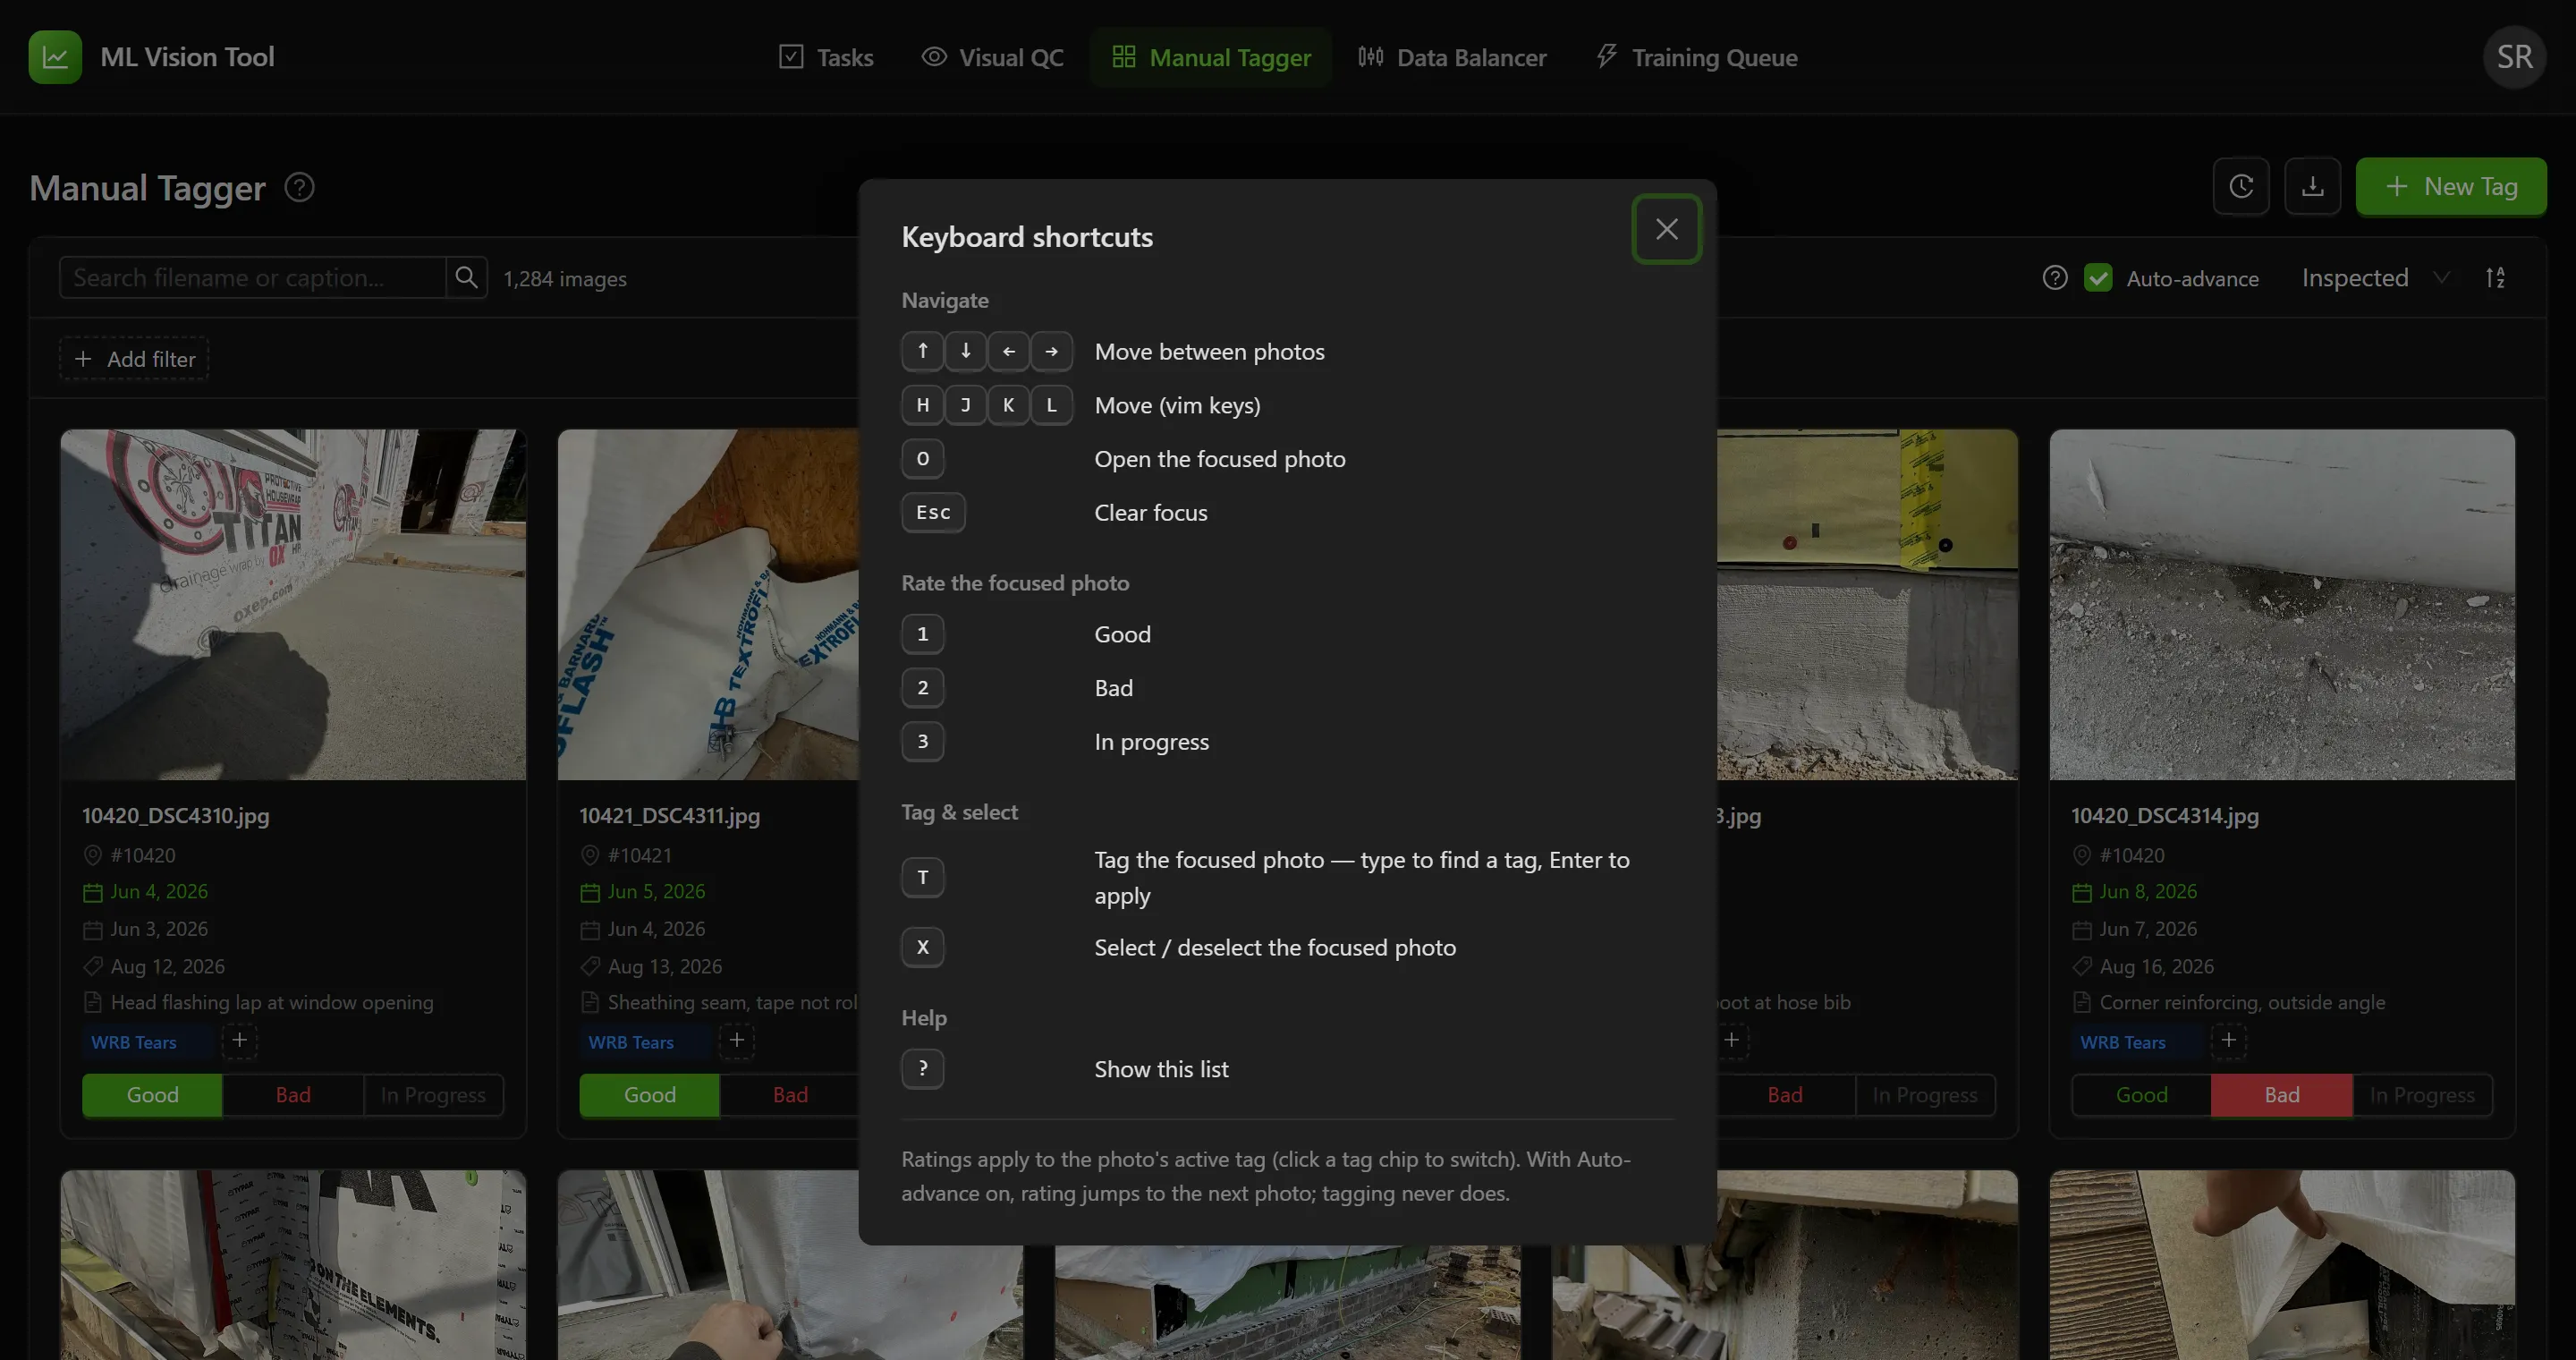
Section titled “Keyboard Shortcuts”Select a card, or press any of the keys below once, to give the grid focus. The ? key opens a Keyboard shortcuts panel with the same list. Shortcuts do not fire while you are typing in a box.
| Key | Action |
|---|---|
| ↑ ↓ ← → | “Move between photos” |
| H J K L | “Move (vim keys)” |
| O | “Open the focused photo” |
| Esc | “Clear focus” |
| 1 | “Good” |
| 2 | “Bad” |
| 3 | “In progress” |
| T | “Tag the focused photo — type to find a tag, Enter to apply” |
| X | “Select / deselect the focused photo” |
| ? | “Show this list” |
With nothing focused yet, the first press of any key only focuses the first photo — it does not also perform the action. Press it again to act.
Auto-advance in the toolbar, on by default, moves focus to the next photo after each rating: “After rating with 1 / 2 / 3, jump to the next photo”. Turn it off to rate one photo against several tags in turn.
Creating and Deleting Tags
Section titled “Creating and Deleting Tags”Select New Tag in the page header. The panel it opens is titled Tags, and it both creates tags and removes the ones you made.
Creating a tag
Section titled “Creating a tag”- Enter a Tag name.
- Optional: change the colour beside Color:.
- Select Create. A message confirms “Created tag” with the name.
The new tag is added to your current filter straight away, so the grid will change to show only photos carrying it — which, for a tag just created, is none.
Deleting a tag you created
Section titled “Deleting a tag you created”Below the create form, Tags you created lists your own tags, each with its colour and a delete button. Where you have made none, it reads “You haven’t created any tags yet.”
- Select the delete button beside the tag.
- A confirmation asks “Delete this tag?” and warns “This cannot be undone.”
- Select Delete. A message confirms “Deleted tag” with the name.
Deleting a tag that is currently in your filter chips also removes it from the filter. A note under the list explains the limits: “The other N tags are built in and cannot be deleted. A tag can only be deleted once no images are assigned to it.”
Activity Log and Undo
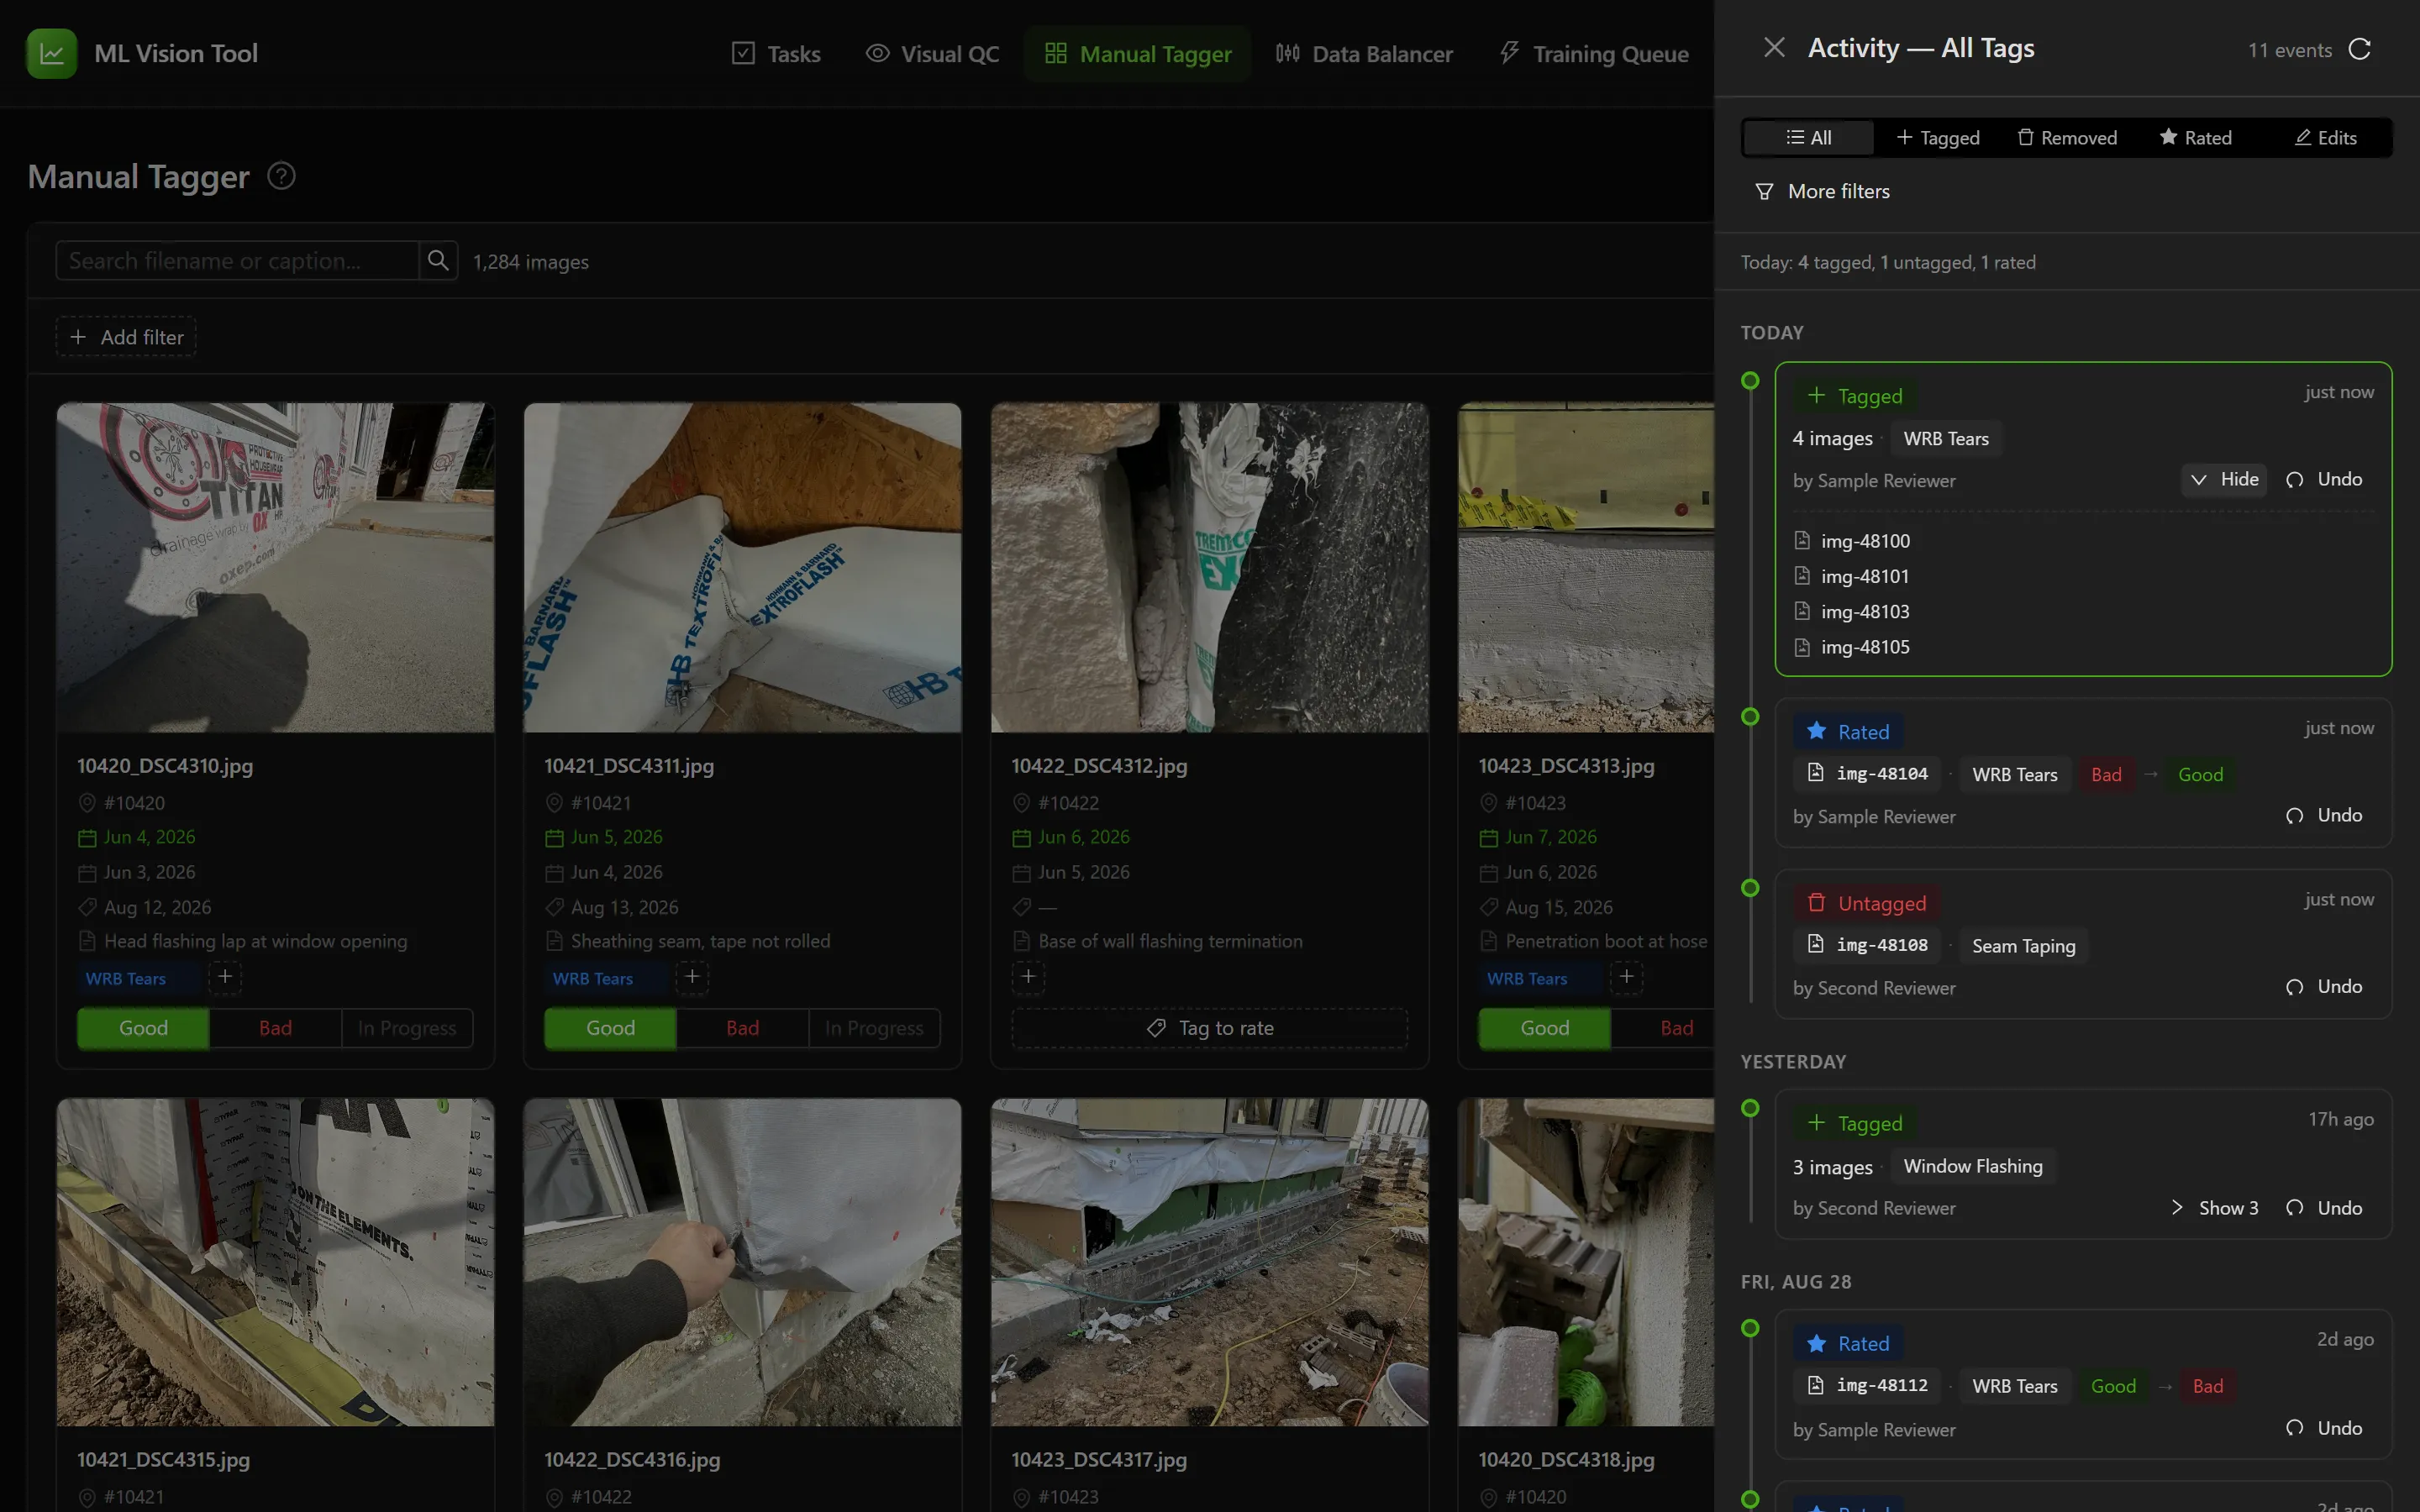
Section titled “Activity Log and Undo”Select Activity log in the page header. The panel is titled Activity — All Tags, or named for the tag where exactly one is filtered, and counts the entries beside it. It refreshes on its own every half-minute; Refresh pulls it immediately.
Entries group by day under Today, Yesterday and then dates. Where there is activity today, a line above the list summarises it as “Today:” followed by the tagged, untagged and rated counts.
Each entry is one action, which may have covered many photos, and shows:
- What happened — Tagged, Untagged, Rated, Tag created, Tag updated or Tag deleted
- The photo, or a count where several were involved
- The tags, and for a rating the change from one value to another
- When, and who did it
Narrow the list with the buttons across the top — All, Tagged, Removed, Rated and Edits — or open More filters for All users and a date range. Clear resets them. Where an action covered several photos, Show with the count expands it to one row per photo.
Undoing an action
Section titled “Undoing an action”Tagged, Untagged and Rated entries carry an Undo button, which reverses the whole action — every photo it touched, not one:
- Tagged — removes the tag again, and clears any ratings made against it
- Untagged — puts the tag back
- Rated — restores the rating each photo had before
Downloading a Training Dataset
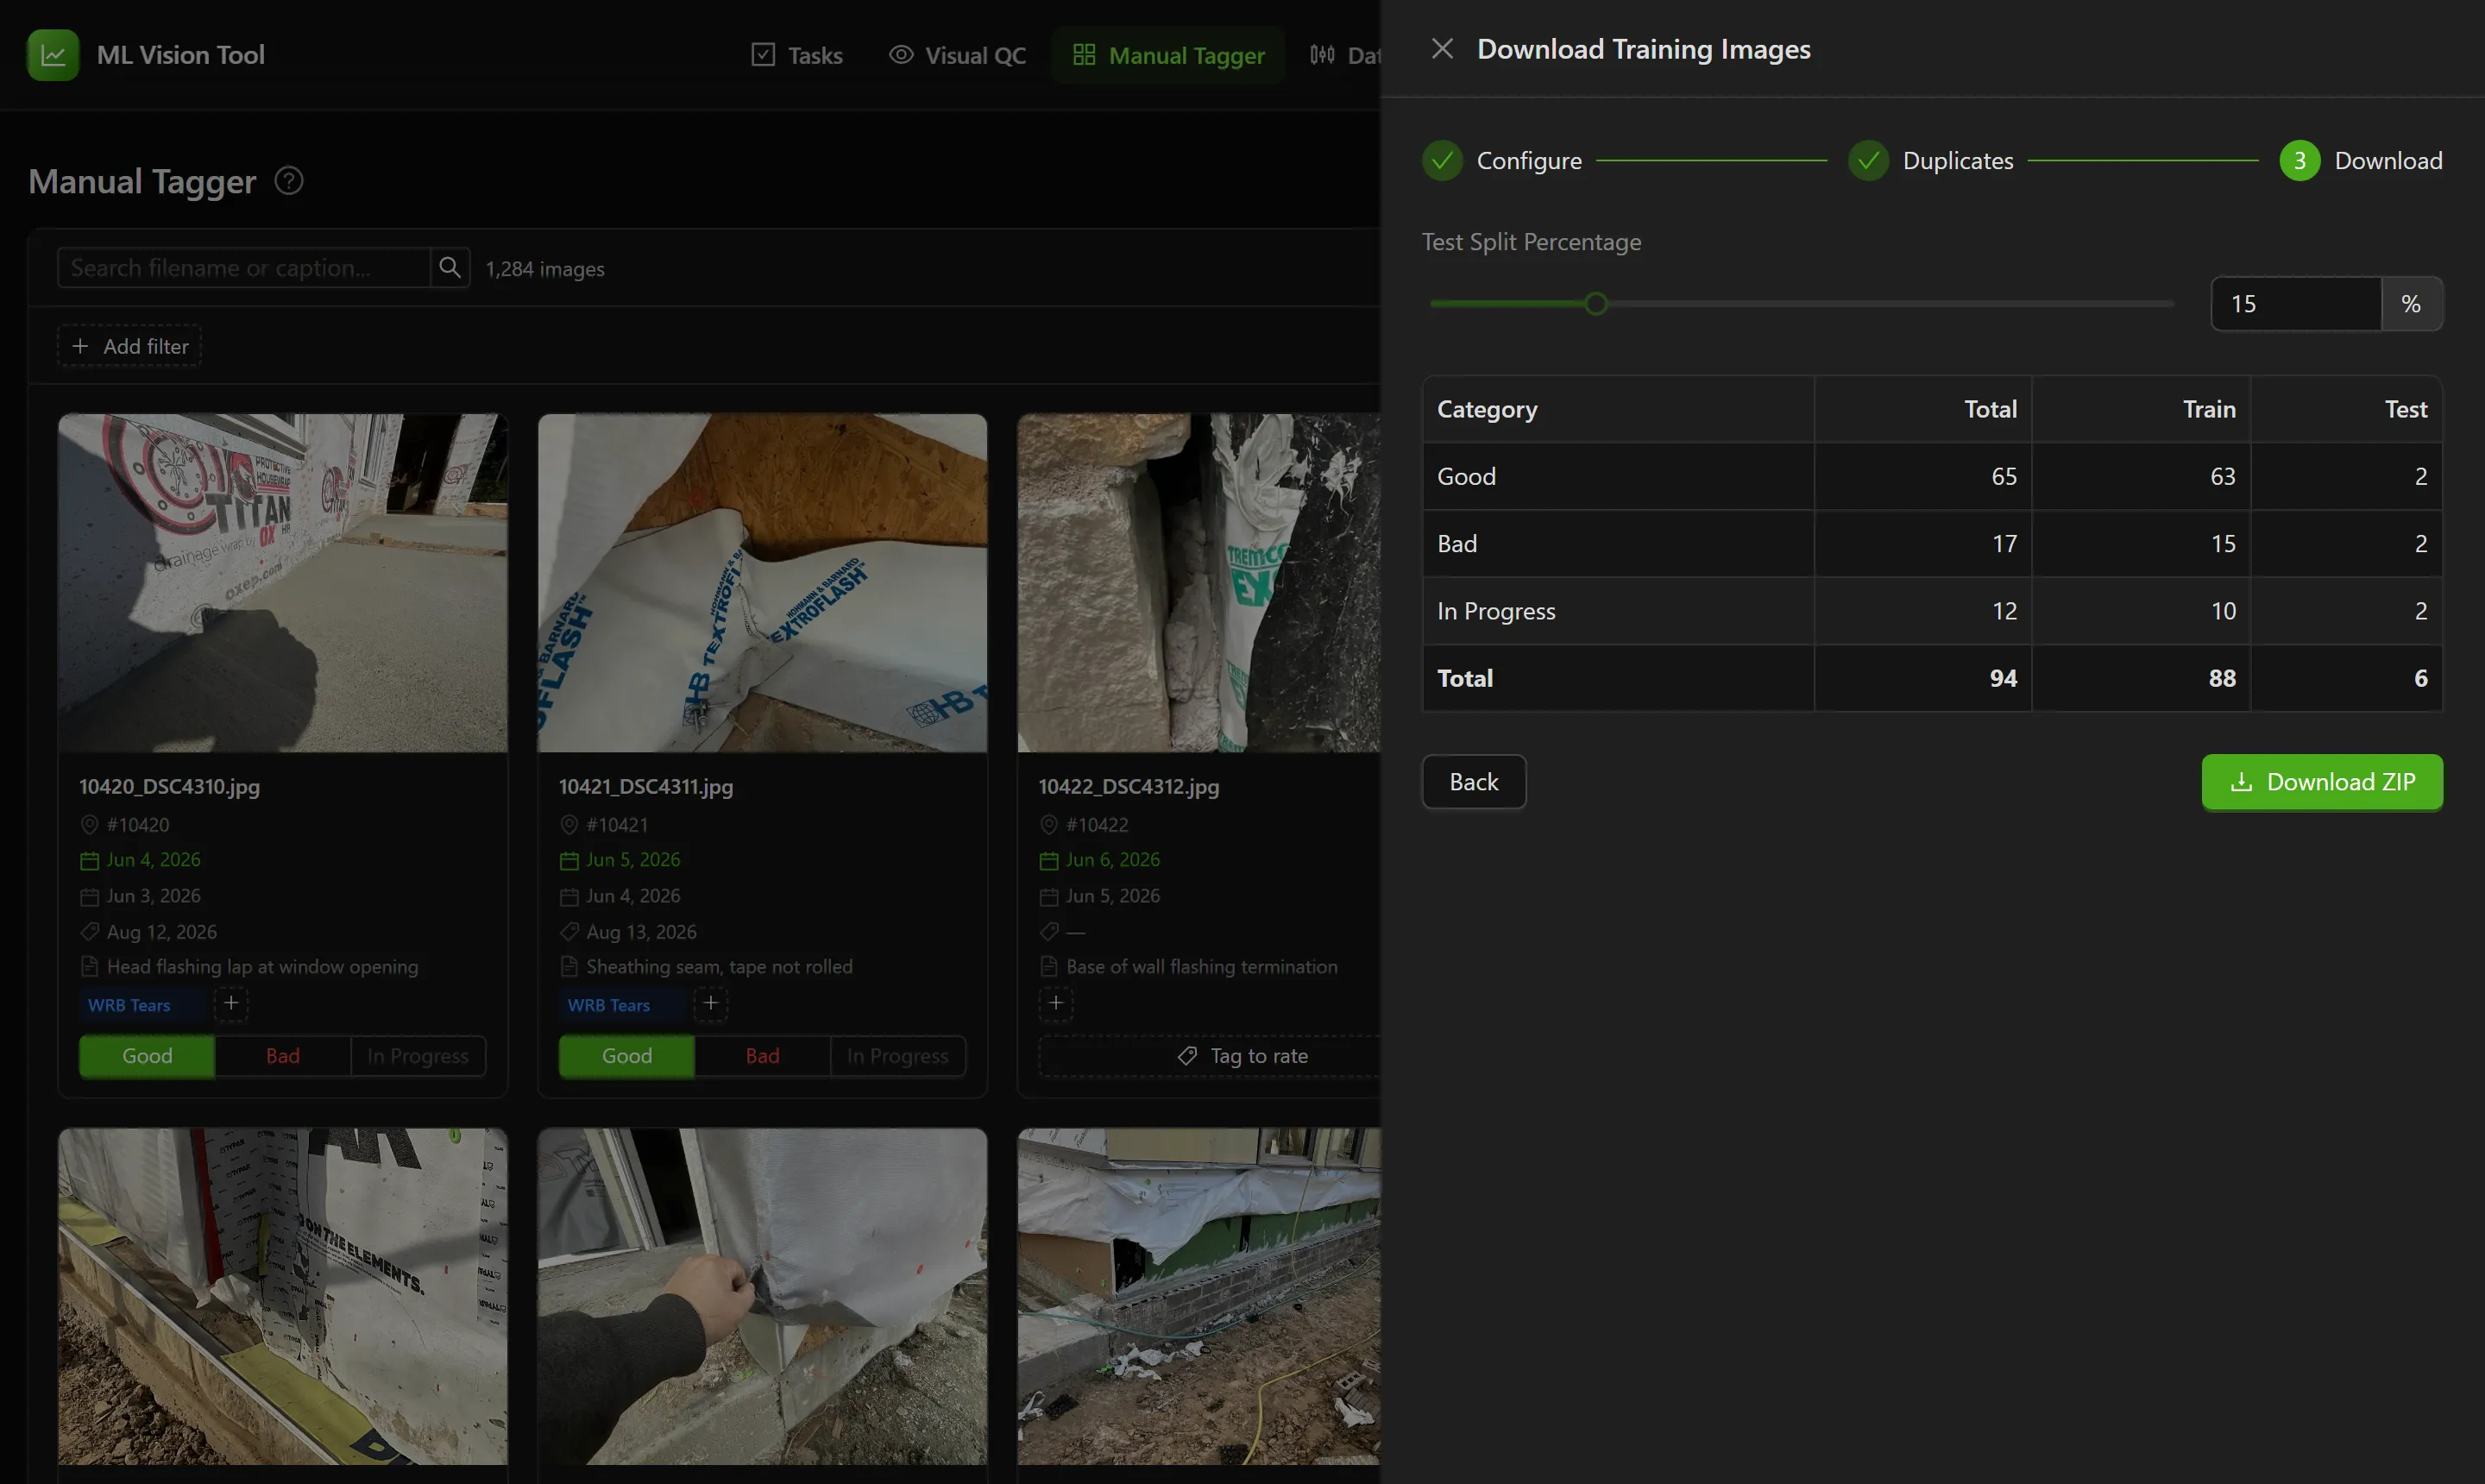
Section titled “Downloading a Training Dataset”Select Download training images in the page header. The panel is titled Download Training Images and runs in three steps: Configure, Duplicates, Download.
Step 1: Configure
Section titled “Step 1: Configure”- Choose one Tag — the list prompts “Choose a tag to download…”.
- Under Categories, tick the ratings to include: Good, Bad, In Progress. All three start ticked.
- Set Date Filter to Inspected Date or Tagged Date, and optionally pick a range.
- Select Analyze. Counts appear for Total, Good, Bad and In Progress.
- Select Next.
Past 200 photos a warning appears about the download taking several minutes and possibly timing out. The work runs in your browser, so closing the panel abandons it.
Previous exports, above the settings, lists what has already been taken for the chosen tag — the date range, then the image count, size, duplicates skipped, date and who ran it. Where nothing has been exported for that tag it reads “Nothing exported for this tag yet.”
On the most recent entry, Continue from here sets the range to start the day after that export ended and run to today, which is how you pick up where the last export stopped without re-downloading it. Where the export finishes but cannot be recorded, a message reads “Download finished, but it could not be added to the history.” — the ZIP is still yours; only the history line is missing.
Step 2: Duplicates
Section titled “Step 2: Duplicates”Identical photos are found automatically and grouped, counted as Unique Images and Duplicates Found. One member of each group is marked Kept and the rest are left out. Where there are none, the step reports “No duplicates found”. Select Next.
Detection compares stored checksums, and photos uploaded in multiple parts cannot be compared this way — a few duplicates can get through.
Step 3: Download
Section titled “Step 3: Download”- Set Test Split Percentage with the slider. It accepts 5 to 50 and starts at 15.
- Check the preview table, which breaks down Category, Total, Train and Test.
- Select Download ZIP. Progress runs through fetching and then zipping.
- Download Complete reports the photo count and file size. Select Close.
The archive is named for the tag and holds the photos split into train and test folders, divided by rating.
Troubleshooting
Section titled “Troubleshooting”The grid is empty after I filtered
Section titled “The grid is empty after I filtered”Solutions:
- Clear the Rating chip. Filtering to a rating nobody has given yet returns nothing.
- Clear the Date captured, Date tagged, Site visit and Building chips.
- Clear the search box. Clear all resets the chips but not the search box, which is the usual reason a grid stays empty after clearing everything.
- A tag you have just created has no photos yet.
- Site visit is an exact match. A partial ID returns nothing.
A rating I just set went back
Section titled “A rating I just set went back”Solutions:
- The change is shown before it is saved, so a failed save undoes it on screen. Check the message that appeared and try again.
- Where you are offline the app says “You’re offline — reconnect and try again.” and every change is rolled back.
- Open the activity log and look for the rating. If it is not there, it never saved.
The rating buttons are missing on a photo
Section titled “The rating buttons are missing on a photo”Solutions:
- The photo has no tags, so there is nothing to rate against. Use Tag to rate, or press T.
The bulk bar shows no rating buttons
Section titled “The bulk bar shows no rating buttons”Solutions:
- Add a tag chip to your filter. The bar reads “Select a tag filter to bulk-rate” until you do.
- With several tags filtered, choose one in the Rate: list.
My selection disappeared
Section titled “My selection disappeared”Solutions:
- Changing the tag or rating filter clears the selection on purpose, so that a bulk action cannot reach photos you can no longer see.
- Starting a bulk tag also clears it.
Undo returned an error
Section titled “Undo returned an error”Solutions:
- More than 24 hours have passed: “Undo window expired (24h)”. Re-tag or re-rate by hand.
- Tag creation, renaming and deletion cannot be undone.
- Very old entries may report “Cannot undo: this activity was logged before tagId was recorded”. These predate the current activity records and cannot be reversed.
I need to rename or delete a tag
Section titled “I need to rename or delete a tag”Solutions:
- Renaming is not possible anywhere in the Manual Tagger. Ask an administrator.
- A tag you created yourself can be deleted from the Tags panel, under Tags you created, but only once no photos are assigned to it. Remove the tag from its photos first, then delete it.
- Built-in tags cannot be deleted by anyone. The panel says how many there are.
- Where a tag was created by mistake and has no photos on it, leaving it in place is harmless.
A photo will not display
Section titled “A photo will not display”Solutions:
- Photos are served from the inspection image store. An individual photo can be missing there, which is expected rather than a fault in the tagger.
- Where every photo is blank, you have lost your connection or your session has expired. Reload the page and sign in again.
The download times out or fails
Section titled “The download times out or fails”Solutions:
- Narrow the date range, or untick a category, to bring the count down. Exports over 200 photos are the ones that time out.
- Leave the panel open until it finishes — closing it abandons the download.
- Where the counts look too low, remember that unrated photos are never exported.
Related Articles
Section titled “Related Articles”- Visual QC Review — Rate a trained model’s predictions against the photos you tagged here
- Managing Photo Tags and Conditions — The condition tags used across nSpec and SuperClear AI
- Understanding AI Detection Scores — How detection confidence is calculated and read