
Understanding AI Detection Scores
Every time SuperClear AI’s computer vision model marks a defect, it assigns a confidence score — a percentage from 0 to 100 that represents how sure the model is. You can control which detections appear on your photos by adjusting a confidence threshold slider. This article explains what the scores mean, how to use the threshold to filter out noise, and how to interpret the AI’s confidence in practice.
What a Confidence Score Means
Section titled “What a Confidence Score Means”When the AI looks at a photo and finds something that might be a WRB defect, it produces both:
- A bounding box showing where in the photo the defect is
- A confidence score from 0% to 100% representing how confident the AI is that this is actually a defect
Higher scores mean the AI is more confident. A 90% score means the AI is very sure. A 30% score means the AI thinks there might be something there, but it’s not certain.
The Confidence Threshold
Section titled “The Confidence Threshold”Rather than showing every detection no matter how unsure the AI is, SuperClear AI lets you set a threshold. Detections with scores below the threshold are hidden from the photo. The default threshold is 25%.
- Lower threshold (e.g., 10%) — Shows more detections, including low-confidence ones. Useful when the AI has missed something obvious — sometimes lowering the threshold reveals a low-confidence detection that’s actually correct.
- Default threshold (25%) — Balanced. Shows reasonably confident detections without too much noise.
- Higher threshold (e.g., 80%) — Shows only the most confident detections. Useful for high-stakes punch lists where you want very few false positives.
Adjusting the Threshold
Section titled “Adjusting the Threshold”- On the SuperClear AI Screen, click the gear icon in the toolbar
- Click Settings (Photo Settings)
- The Photo Settings modal opens
- Find the Confidence Threshold slider
- Drag the slider to your desired value (0% to 100%)
- The current value displays next to the slider
- Save the modal
- Refresh the photo grid — annotations update to reflect the new threshold
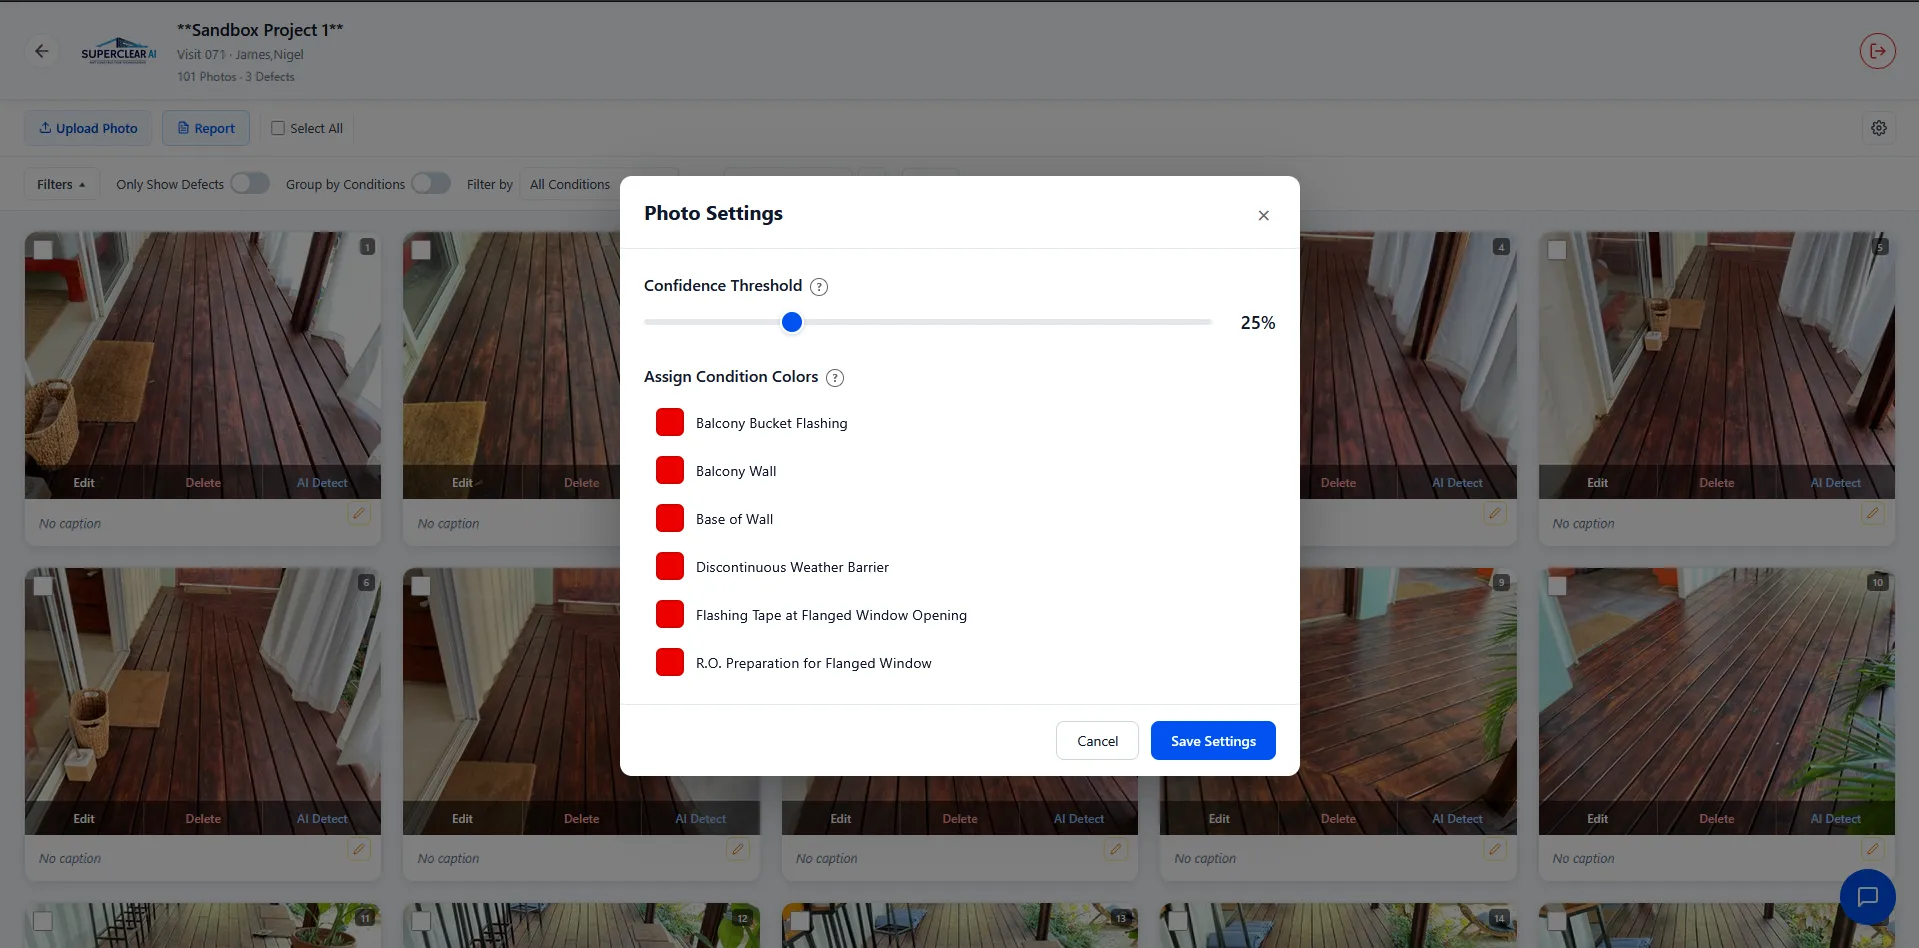
The threshold is per-inspection — different inspections can have different thresholds.
Where to See the Actual Scores
Section titled “Where to See the Actual Scores”Confidence scores aren’t displayed directly on photo cards (they’d clutter the visual). To see scores for individual detections:
- Click on a photo to open the photo card details
- Click on a completed status circle (the green check below the photo)
- The Analysis Details modal opens, showing the AI’s reasoning and confidence numbers for each detection
The Analysis Details modal includes a disclaimer: “This analysis was generated by AI and may not be fully accurate. Always verify results with professional judgment.”
Practical Score Ranges
Section titled “Practical Score Ranges”| Score range | What it usually means | How to handle |
|---|---|---|
| 80% – 100% | High confidence — the AI is very sure this is a defect | Trust the detection; quick visual check is enough |
| 50% – 80% | Moderate confidence — likely a defect, but worth a closer look | Review the photo and confirm before including in the punch list |
| 25% – 50% | Low confidence — could be a defect or could be a false positive | Examine carefully; delete the markup if it’s clearly wrong |
| Below 25% | Very low confidence — usually filtered out by the default threshold | Hidden by default; lower the threshold if you want to see them |
A Practical Workflow
Section titled “A Practical Workflow”A common pattern for getting the most out of confidence scores:
- Start with the default threshold (25%) and review the photos as-is
- If you see false positives (markups on things that aren’t defects), raise the threshold to 50% or higher
- If you suspect missed defects, lower the threshold to 10% temporarily and look for low-confidence detections you missed
- After tuning, set the threshold back to a comfortable middle (around 30-40% for most teams)
- Generate the punch list with the threshold dialed in
Limitations to Know
Section titled “Limitations to Know”- Confidence isn’t accuracy. A high score doesn’t guarantee correctness, and a low score doesn’t mean the AI is wrong. Always verify with your own eyes.
- Scores depend on photo quality. Blurry or poorly-lit photos produce lower scores even when defects are real. See Photo Requirements for AI Detection.
- The threshold is a filter, not a fix. Hiding a low-confidence detection doesn’t make it go away — the underlying detection is still in the database. You’re just choosing not to display it.
- Per-tag images respect the threshold. When you switch to Group by Conditions view, the per-tag annotation overlays only show detections above the current threshold.
Troubleshooting
Section titled “Troubleshooting”Why don’t I see any detections?
Section titled “Why don’t I see any detections?”Solutions:
- The AI may not have found any defects above your current threshold. Try lowering the threshold to see if there are low-confidence detections.
- Check the status circles on the photo card — if they’re not green, AI processing isn’t done yet
- The photo may genuinely not have any detectable WRB defects
There are too many detections on a photo
Section titled “There are too many detections on a photo”Solutions:
- Raise the confidence threshold in Photo Settings
- Use the image editor to delete individual incorrect markups
- Consider whether the photo quality is too low — see Photo Requirements for AI Detection
I changed the threshold but the photo still looks the same
Section titled “I changed the threshold but the photo still looks the same”Solutions:
- Make sure you saved the Photo Settings modal
- Refresh the page — annotations are rendered when photos load
- If the photo is in grouped view, switch to flat view to confirm the threshold is being applied