
Managing Clients in nSpec
Clients are the companies you perform inspections for. Every project in nSpec belongs to a client, so setting up your client list is one of the first things you’ll do as an admin. This article covers the full client lifecycle — creating, editing, deleting, and managing client divisions — for standard nSpec tenants. (Procore tenants should also see Managing NSPEC-X Clients for the Procore-specific differences.)
Accessing the Clients Screen
Section titled “Accessing the Clients Screen”- Sign in to nSpec at inspect-app.nspec.app
- Open the sidebar (☰ menu)
- Click Clients
You need the View Clients permission to see this screen. If it’s not in your sidebar, ask your administrator to assign you a role that includes that permission.
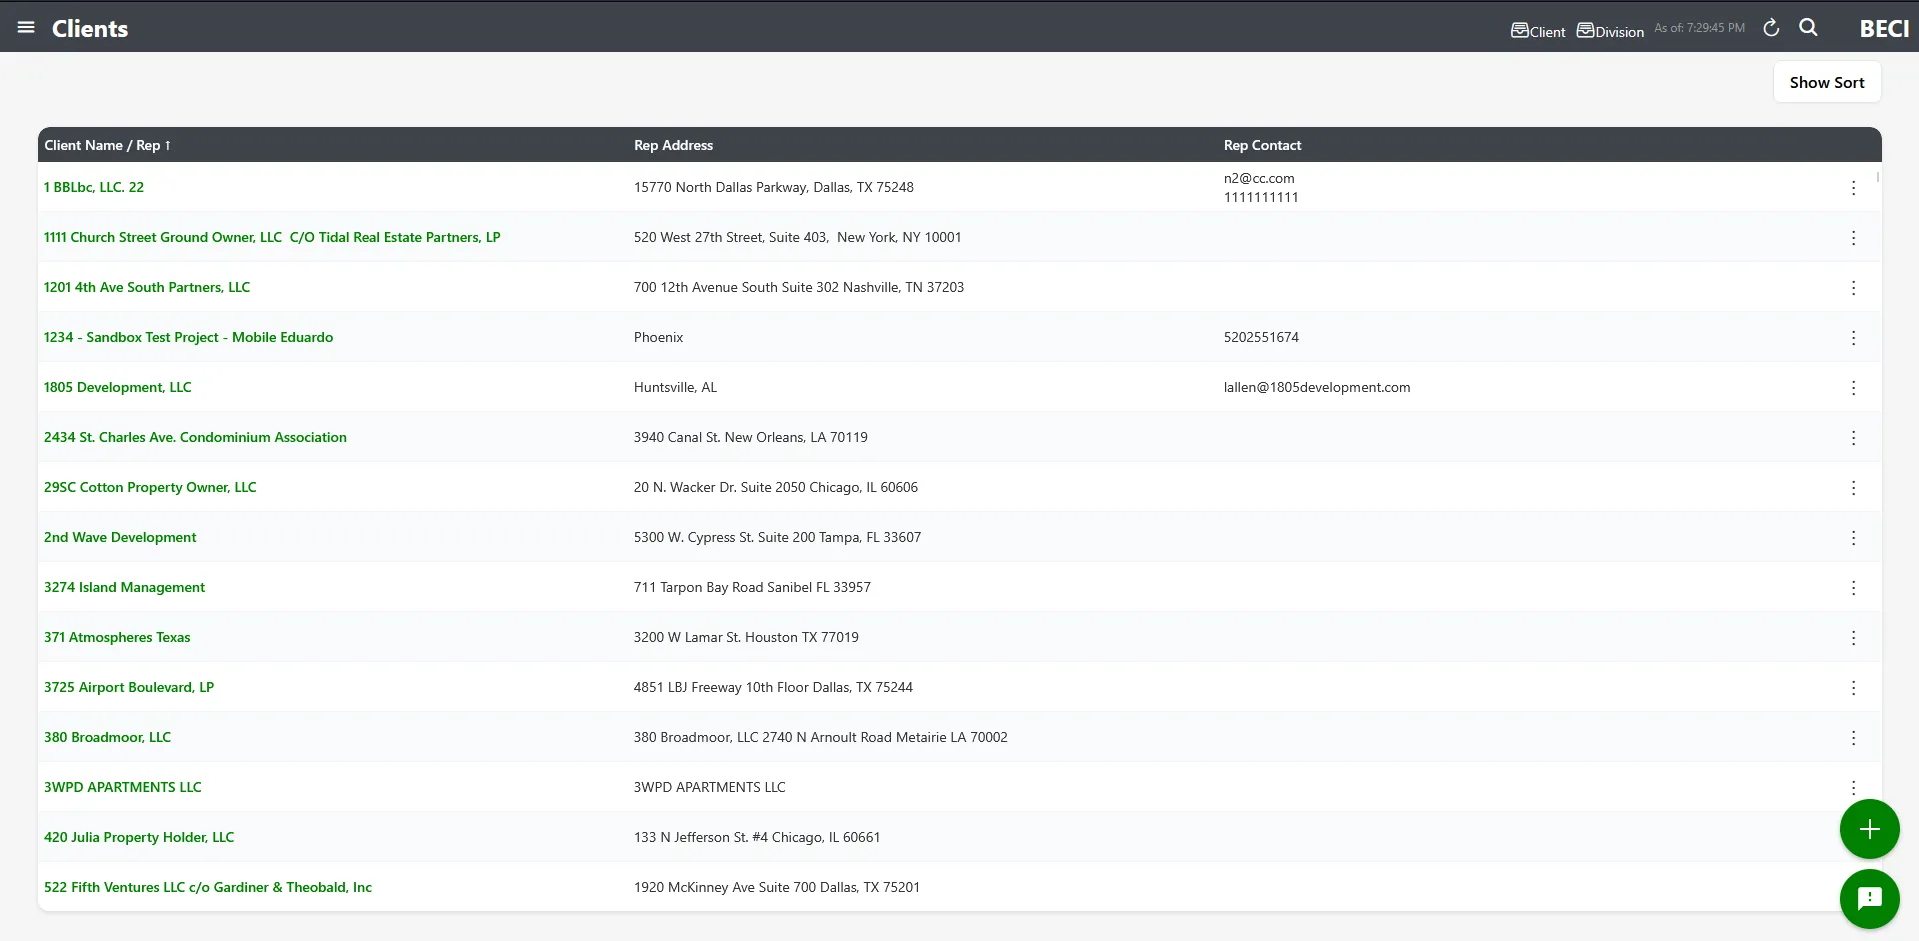
The Clients List
Section titled “The Clients List”The Clients screen shows every client in your tenant. The table has three columns:
| Column | What it shows |
|---|---|
| Client Name / Rep | The client’s name on top, the primary representative’s name below in smaller text |
| Rep Address | The primary representative’s address |
| Rep Contact | Email and phone for the primary representative |
Search and sort
Section titled “Search and sort”- Use the search bar at the top to filter by client name. The search is case-insensitive.
- Click Show Sort to open the sort panel and choose how the list is ordered. You can sort A-Z or Z-A by Client Name, Rep Address, or Rep Contact.
Creating a Client
Section titled “Creating a Client”- On the Clients screen, click the + floating action button in the bottom-right
- The Create Client modal opens
- Fill in the fields below
- Click Save
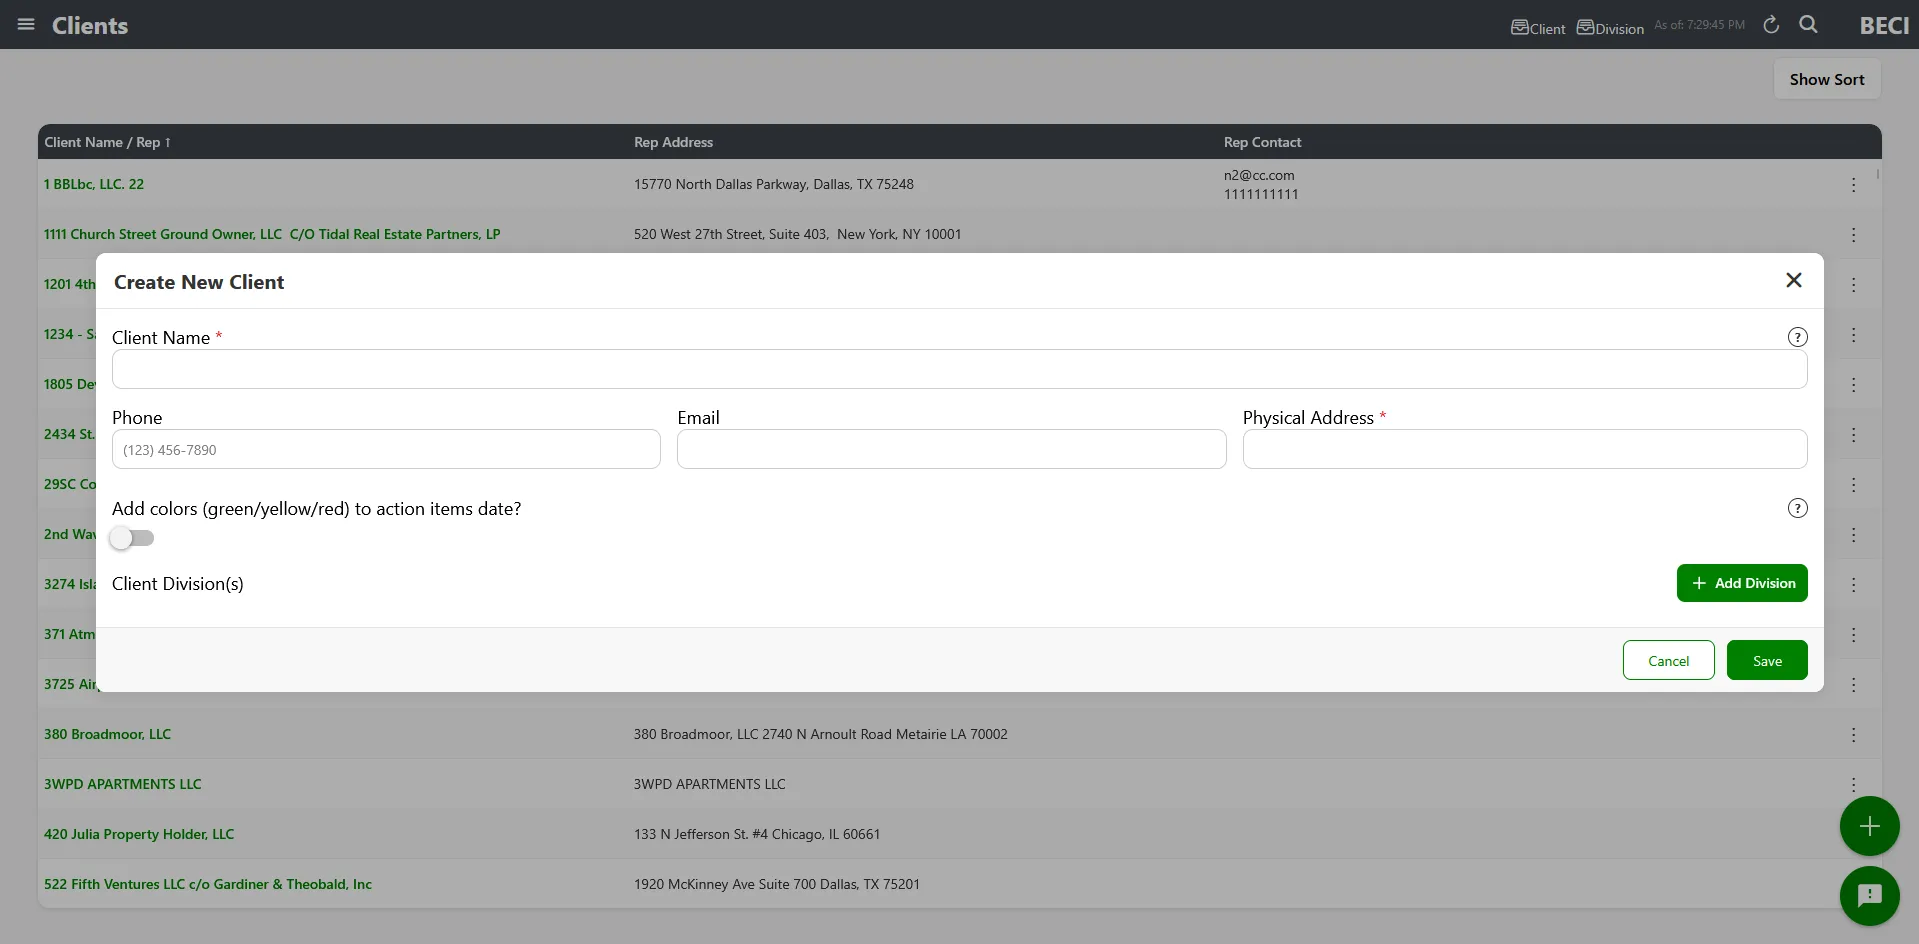
Client fields
Section titled “Client fields”| Field | Required | Notes |
|---|---|---|
| Client Name | Yes | Up to 200 characters. This is what the client appears as throughout nSpec — be specific. |
| Phone | No | Numbers only |
| No | Up to 50 characters. Must be a valid email format if you fill it in. | |
| Physical Address | Yes | Up to 250 characters. (For Procore tenants this field is optional — see Managing NSPEC-X Clients.) |
| Add colors (green/yellow/red) to action items date? | No | Checkbox. Enables date-based color coding on action items associated with this client. See the section below. |
Action Item Date Coloring
Section titled “Action Item Date Coloring”When you check the Add colors (green/yellow/red) to action items date? option on a client, action items associated with their projects will display date colors based on how soon they’re due:
- Green — Due date is comfortably in the future
- Yellow — Due date is approaching
- Red — Due date has passed or is imminent
This is a per-client setting and only available for standard NSPEC tenants (not Procore). Use it for clients who need fast visual prioritization of outstanding work.
Client Divisions
Section titled “Client Divisions”Larger clients often have separate divisions or business units that need to be tracked independently. nSpec supports this with Client Divisions — named subdivisions you can attach to projects under that client.
Adding a division
Section titled “Adding a division”- Open the client (click the row in the Clients list, or use the action menu → Edit)
- Scroll to the Client Division(s) section
- Click Add Division
- Type a division name (up to 100 characters) and click the checkmark icon to save
Editing or deleting a division
Section titled “Editing or deleting a division”- In the Client Division(s) section, find the division
- To edit: click the pencil icon, change the name, click the checkmark to save
- To delete: click the trash icon, then confirm the deletion in the dialog
Editing a Client
Section titled “Editing a Client”- On the Clients screen, click the row for the client (or use the action menu → Edit)
- The Edit Client modal opens with all current fields pre-populated
- Change any fields you need to update
- Click Save
If you have unsaved changes and try to close the modal, nSpec will warn you before discarding them.
Deleting a Client
Section titled “Deleting a Client”- On the Clients screen, find the client
- Click the action menu (three dots) on the client row
- Click Delete
- Confirm the deletion in the dialog. The dialog says: “Are you sure you want to delete this client? This action cannot be undone.”
You need the Delete Clients permission to see the Delete option in the action menu.
Permissions Required
Section titled “Permissions Required”| Action | Permission |
|---|---|
| View the Clients screen | View Clients |
| Create or edit clients | Add/Edit Clients (or employee status) |
| Delete clients | Delete Clients |
| See the Procore Company ID field | Enterprise/Procore Company permission |
See Roles and Permissions for how to assign these to your team.
Troubleshooting
Section titled “Troubleshooting”The Clients screen is empty
Section titled “The Clients screen is empty”Problem: No clients are showing.
Solutions:
- If your tenant is brand new, no clients have been created yet. Click the + button to add your first one.
- Refresh the page
- If you expected to see clients added by a teammate, ask them to confirm the save was successful
Save button does nothing
Section titled “Save button does nothing”Problem: Clicking Save doesn’t create the client.
Solutions:
- Check that Client Name is filled in (required)
- Check that Physical Address is filled in for NSPEC tenants (required)
- Look for any red validation errors below specific fields
- If the email field is filled in, make sure it’s a valid email format
I don’t see the Delete option
Section titled “I don’t see the Delete option”Problem: The action menu doesn’t show Delete.
Solutions:
- You need the Delete Clients permission. Ask your administrator to update your role.
I don’t see the Client Division(s) section
Section titled “I don’t see the Client Division(s) section”Problem: Edit Client modal doesn’t show divisions.
Solutions:
- Divisions are NSPEC-only. If you’re on a Procore tenant, this feature is not available.
- Wait a moment for the divisions to load — there’s a separate API call when you open the modal
Related Articles
Section titled “Related Articles”- Your First nSpec Project — create a project under a client
- Managing Employees in nSpec
- Managing Collaborators
- Distribution Lists
- Roles and Permissions
- Managing NSPEC-X Clients (for Procore tenants)