
Specimens and Figures
Specimens are the test records used in water test inspections — each one captures the readings from a single test point with its location, water pressure, differential, and supporting photos. nSpec organizes specimens on a dedicated tab inside water test inspections, with a separate Test Day view for the current day’s work. This article explains how specimens work, how to add and edit them, and how the Test Day vs Tests views differ.
Test Day vs Tests
Section titled “Test Day vs Tests”Water test inspections have two specimen-related tabs:
| Tab | Shows | When to use |
|---|---|---|
| Test Day | Only the specimens you’re recording today | While you’re on site, focused on the current day’s work |
| Tests | Every specimen ever recorded for this inspection, across all visits | When reviewing the full inspection or generating the report |
Adding a Specimen
Section titled “Adding a Specimen”- Open a water test inspection
- Click the Test Day tab (or Tests tab)
- Click the + Add Specimen floating action button
- The Add Specimen modal opens
- Fill in the fields below and click Save
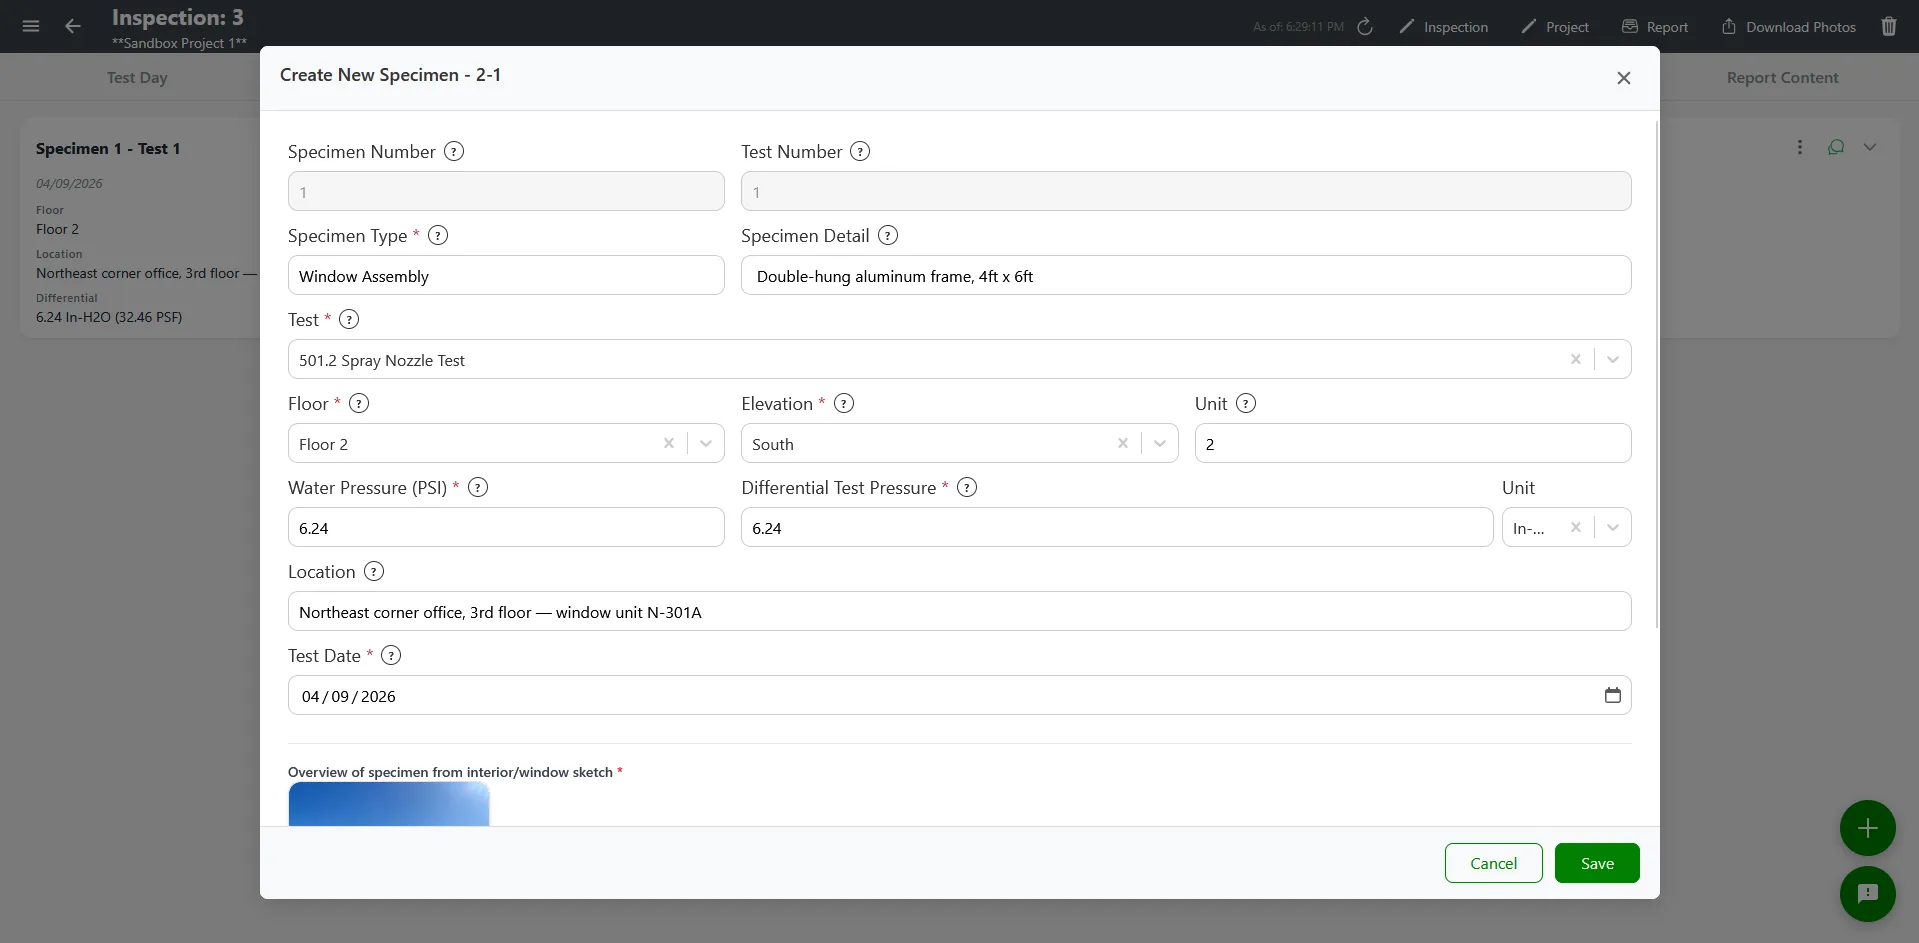
Specimen fields
Section titled “Specimen fields”| Field | Required | Notes |
|---|---|---|
| Test Number | Yes | Numeric identifier for this specific test |
| Type | Yes | The water test type (for example, Air Barrier, Water Barrier). Pick from the dropdown. |
| Type Detail | No | Free-text qualifier for the type |
| Elevation | No | North, South, East, or West |
| Floor | No | Pick from the project’s Floor Options |
| Unit | No | Free-text unit identifier (apartment number, suite, etc.) |
| Location | No | Free-text description of where the test was performed |
| Water Pressure | No | Numeric reading from the test gauge |
| Differential | No | Differential reading. Accepts numbers or “N/A”. |
| Differential Unit | No | Pick from In-H2O or PSF |
| Test Date | No | When the test was performed. Defaults to today. |
| Start Time / End Time | No | How long the test ran |
| Observation | No | Link to a related observation in this inspection |
| Notes | No | Free-form list of note items, each editable individually |
| Images (up to 4) | No | Photos with captions |
Editing a Specimen
Section titled “Editing a Specimen”- Find the specimen on the Test Day or Tests tab
- Click the action menu (three dots) → Edit
- Update any fields
- Click Save
Duplicating a Specimen
Section titled “Duplicating a Specimen”When you’re running multiple similar tests at the same location, duplicating saves time over re-entering all the location and metadata fields.
- Find the specimen you want to duplicate
- Click the action menu (three dots) → Duplicate
- A new specimen is created with the same metadata
- Update the test number, readings, and any fields that should differ
- Save
Deleting a Specimen
Section titled “Deleting a Specimen”- Find the specimen
- Click the action menu (three dots) → Delete
- Confirm in the dialog
Deletion is permanent. If the specimen has photos you want to keep, save them somewhere else first.
Adding Photos to a Specimen
Section titled “Adding Photos to a Specimen”Specimens have two ways to add photos:
- From the Add/Edit Specimen modal — Use the photo slots to attach up to 4 photos with captions, the same way you would on an observation
- From the action menu — Click Add Photo in the specimen’s action menu to open Quick Capture and add photos directly without re-opening the modal
Linking a Specimen to an Observation
Section titled “Linking a Specimen to an Observation”Specimens can reference a related observation. This is useful when a test result corresponds to a finding documented as an observation:
- Open the Add or Edit Specimen modal
- Find the Observation field
- Pick the related observation from the dropdown
- Save
In the report, the linked observation appears alongside the specimen’s test data.
Best Practices
Section titled “Best Practices”- Use Test Day during the visit, Tests for review. Test Day filters out distractions from previous visits.
- Be consistent with Test Numbers. Pick a numbering scheme (sequential, by floor, by area) and stick with it across the inspection.
- Fill in Location and Unit even if optional. Future you will thank you when reviewing the report.
- Duplicate to save time when running similar tests at the same location.
- Take photos of the test setup AND the result — both are useful for the report.
- Use the Notes list for ad-hoc observations during the test (a sticking gauge, an unusual sound, an interruption) instead of cramming everything into the Type Detail field.
Troubleshooting
Section titled “Troubleshooting”I don’t see Test Day or Tests tabs
Section titled “I don’t see Test Day or Tests tabs”Solutions:
- Specimens are water test only. The tabs are hidden on other report types.
- Confirm the inspection’s Report Type is a water test type
Save fails with validation errors
Section titled “Save fails with validation errors”Solutions:
- Check that Test Number and Type are filled in
- Check that Water Pressure contains only numbers
- Check that Differential is either a number or “N/A”
Test Day tab is empty
Section titled “Test Day tab is empty”Solutions:
- Test Day shows specimens with today’s Test Date. If you backdated the test, it won’t appear here — check the Tests tab instead.