
Quick Capture and Batch Photos
Quick Capture is the fastest way to capture a lot of photos during an inspection. Instead of opening Add Observation, taking one photo, saving, and repeating, you take a burst of photos in one flow and turn each one into a draft observation, an attached image on an existing observation, or a stand-alone photo. This article explains how Quick Capture works, when to use it, and the recent improvements to draft sorting.
When to Use Quick Capture
Section titled “When to Use Quick Capture”Use Quick Capture when:
- You’re walking a site quickly and need to document a lot of conditions in a short time
- You don’t want to interrupt yourself with form filling for each observation
- You’ll come back to the office to clean up captions, tags, and details
- Your team uses a “capture first, polish later” workflow
Stick with the regular Add Observation flow when you need a fully detailed observation right away — for example, a single critical finding you want to file before leaving the site.
Opening Quick Capture
Section titled “Opening Quick Capture”- Open an inspection
- Go to the Photos tab
- Click the Quick Capture floating action button (camera icon) in the bottom-right
- The Quick Capture modal opens
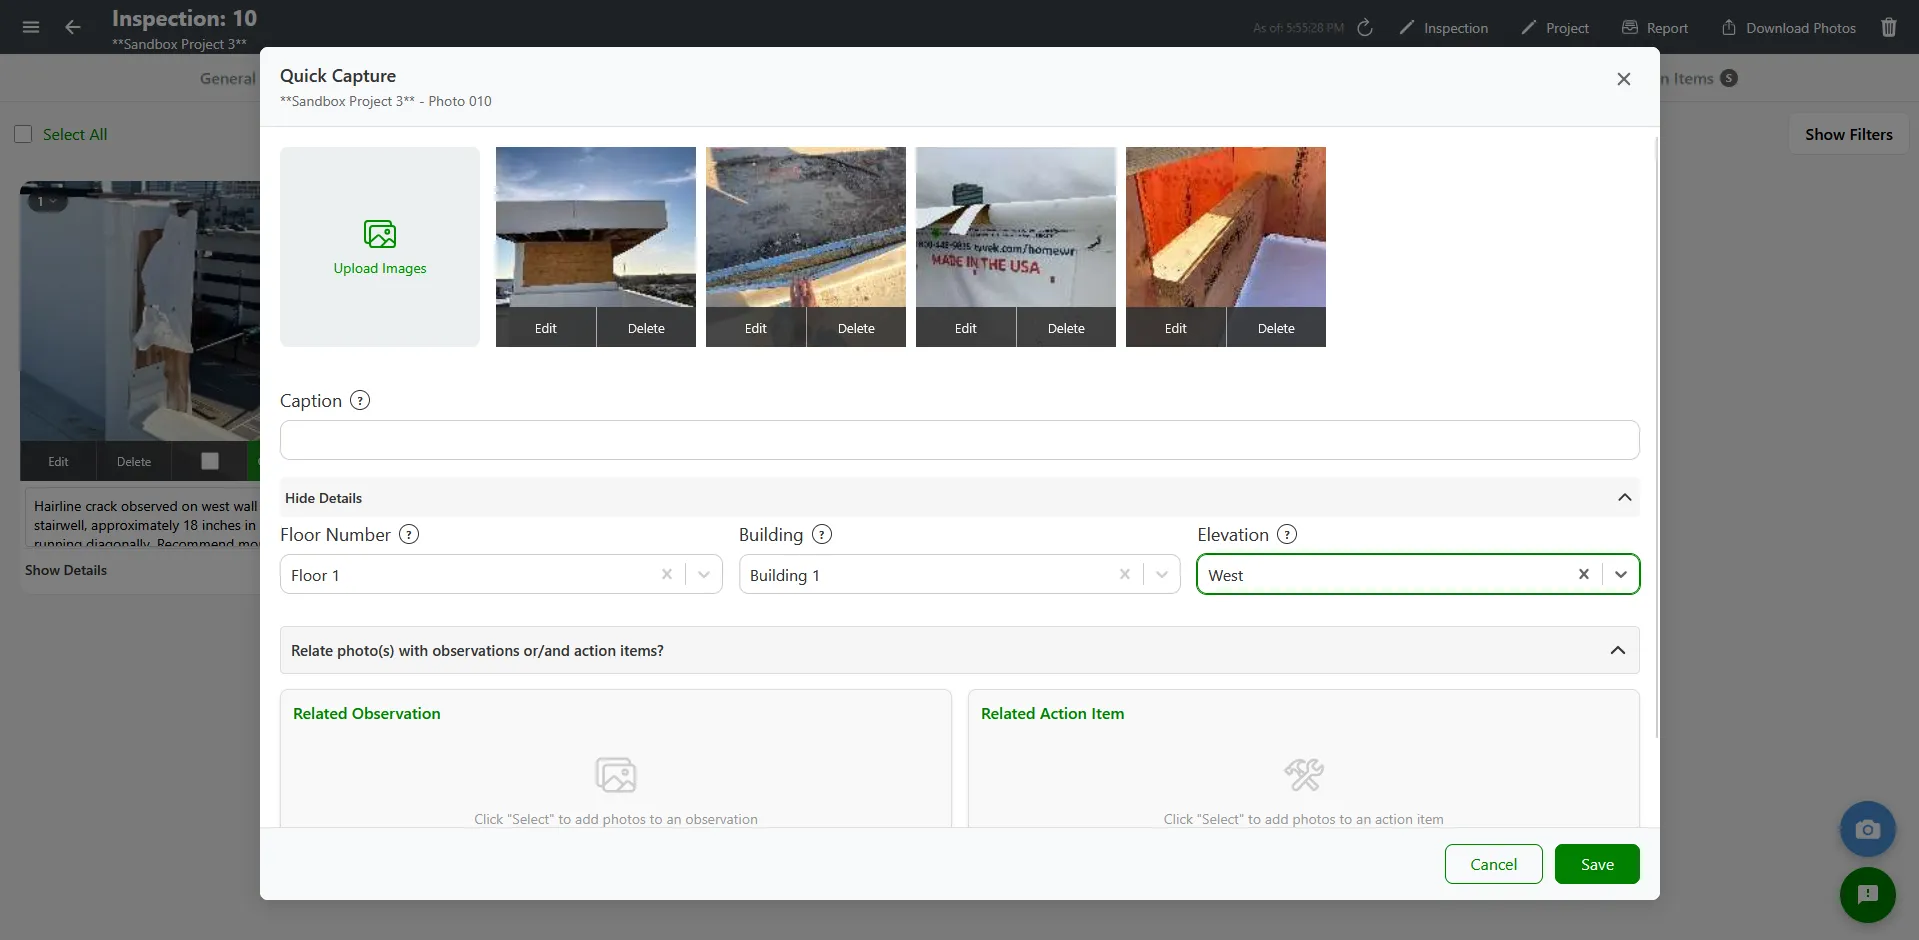
You can also reach Quick Capture from the photo upload buttons in many modals — anywhere you see a camera icon next to a photo slot.
The Quick Capture Flow
Section titled “The Quick Capture Flow”Step 1: Capture or import photos
Section titled “Step 1: Capture or import photos”In the Quick Capture modal, you can:
- Use your device camera to take photos one at a time
- Import existing photos from your device
- Add up to 10 photos in offline mode (more when you’re online)
Step 2: Add metadata to each photo
Section titled “Step 2: Add metadata to each photo”As you add photos, fill in:
- Caption — A short description of what the photo shows
- Building — Which building (from the project’s Building Options)
- Floor — Which floor (from the project’s Floor Options)
- Elevation — North, South, East, or West
- Photo Tags — Multi-select tags from the tenant’s tag list
None of these are required, but the more you fill in now, the less cleanup you’ll have to do later.
Step 3: Choose what to do with each photo
Section titled “Step 3: Choose what to do with each photo”For each photo in the batch, you can:
- Create a draft observation with the photo attached — fastest option, perfect for “I’ll review this later”
- Link the photo to an existing observation — pick the parent observation from a dropdown
- Create an action item with the photo attached
- Save as a stand-alone photo on the inspection (appears on the Photos tab without a parent observation)
Step 4: Edit photos if needed
Section titled “Step 4: Edit photos if needed”Each photo in the Quick Capture batch can be opened in the image editor for cropping, rotation, or annotation before saving. Click the editor icon on the photo card to open it.
Step 5: Save the batch
Section titled “Step 5: Save the batch”- When all photos have the metadata and destination you want, click Save
- nSpec uploads each photo and creates the parent items (drafts, observations, action items) you chose
- A progress indicator shows the batch upload status
- When complete, the modal closes and the new items appear in their respective tabs
Drafts From Quick Capture Sort to the Top
Section titled “Drafts From Quick Capture Sort to the Top”When you create draft observations through Quick Capture, the new drafts appear at the top of the Drafts sub-tab so you can find them on the next pass without scrolling. This is a recent improvement to the sort order designed for the Quick Capture workflow specifically.
See Draft Observations for the full draft workflow.
Quick Capture Offline
Section titled “Quick Capture Offline”Quick Capture works in offline mode, but with a few constraints:
- You can capture up to 10 photos per batch offline
- Photos are saved to your browser’s offline cache, not uploaded right away
- When you reconnect, the Offline Hub uploads them as part of normal sync
- Make sure to sync via the Offline Hub before clearing browser data — otherwise you’ll lose the photos
See Offline Hub Guide for the full offline workflow.
Best Practices
Section titled “Best Practices”- Capture during the walk, polish at the desk. Don’t try to write detailed captions while standing in the field. Get the photo, add a couple of words, and move on.
- Use one Quick Capture batch per area. Open Quick Capture, capture all the photos for the kitchen, save. Then open it again for the bathroom. This makes batches easier to review.
- Create drafts, not finalized observations. Drafts let you sort, prune, and refine in the office. Finalized observations require more attention up front.
- Sync the Offline Hub before leaving for the day if you used Quick Capture offline.
- Use consistent tags. If your team agrees on a tagging convention, Quick Capture becomes a fast way to triage findings by category.
Troubleshooting
Section titled “Troubleshooting”I don’t see the Quick Capture button
Section titled “I don’t see the Quick Capture button”Solutions:
- Make sure you’re on the Photos tab, not General or Observations
- If you’re on a small screen, scroll to the bottom-right corner — the button is there but may be hidden behind your keyboard
Photos aren’t appearing in the Drafts list after saving
Section titled “Photos aren’t appearing in the Drafts list after saving”Solutions:
- Make sure you chose “Create draft observation” for each photo before saving
- Check the Drafts sub-tab — drafts created via Quick Capture appear at the top
- If you’re offline, photos sync via the Offline Hub when you reconnect
I can’t add more photos to the batch
Section titled “I can’t add more photos to the batch”Solutions:
- If you’re offline, you’re limited to 10 photos per batch. Save the current batch and open Quick Capture again for the next 10.
- If the upload progress bar is stuck, wait for it to finish or check your internet connection