
Managing Projects in nSpec
Projects are the workspaces where your inspections live. Every inspection belongs to a project, and projects belong to a client. This article covers the full project lifecycle: viewing, creating, editing, closing, reopening, and deleting projects in nSpec. For first-time setup, see Your First nSpec Project.
Accessing the Projects Screen
Section titled “Accessing the Projects Screen”- Sign in to nSpec at inspect-app.nspec.app
- Open the sidebar (☰ menu)
- Click Projects
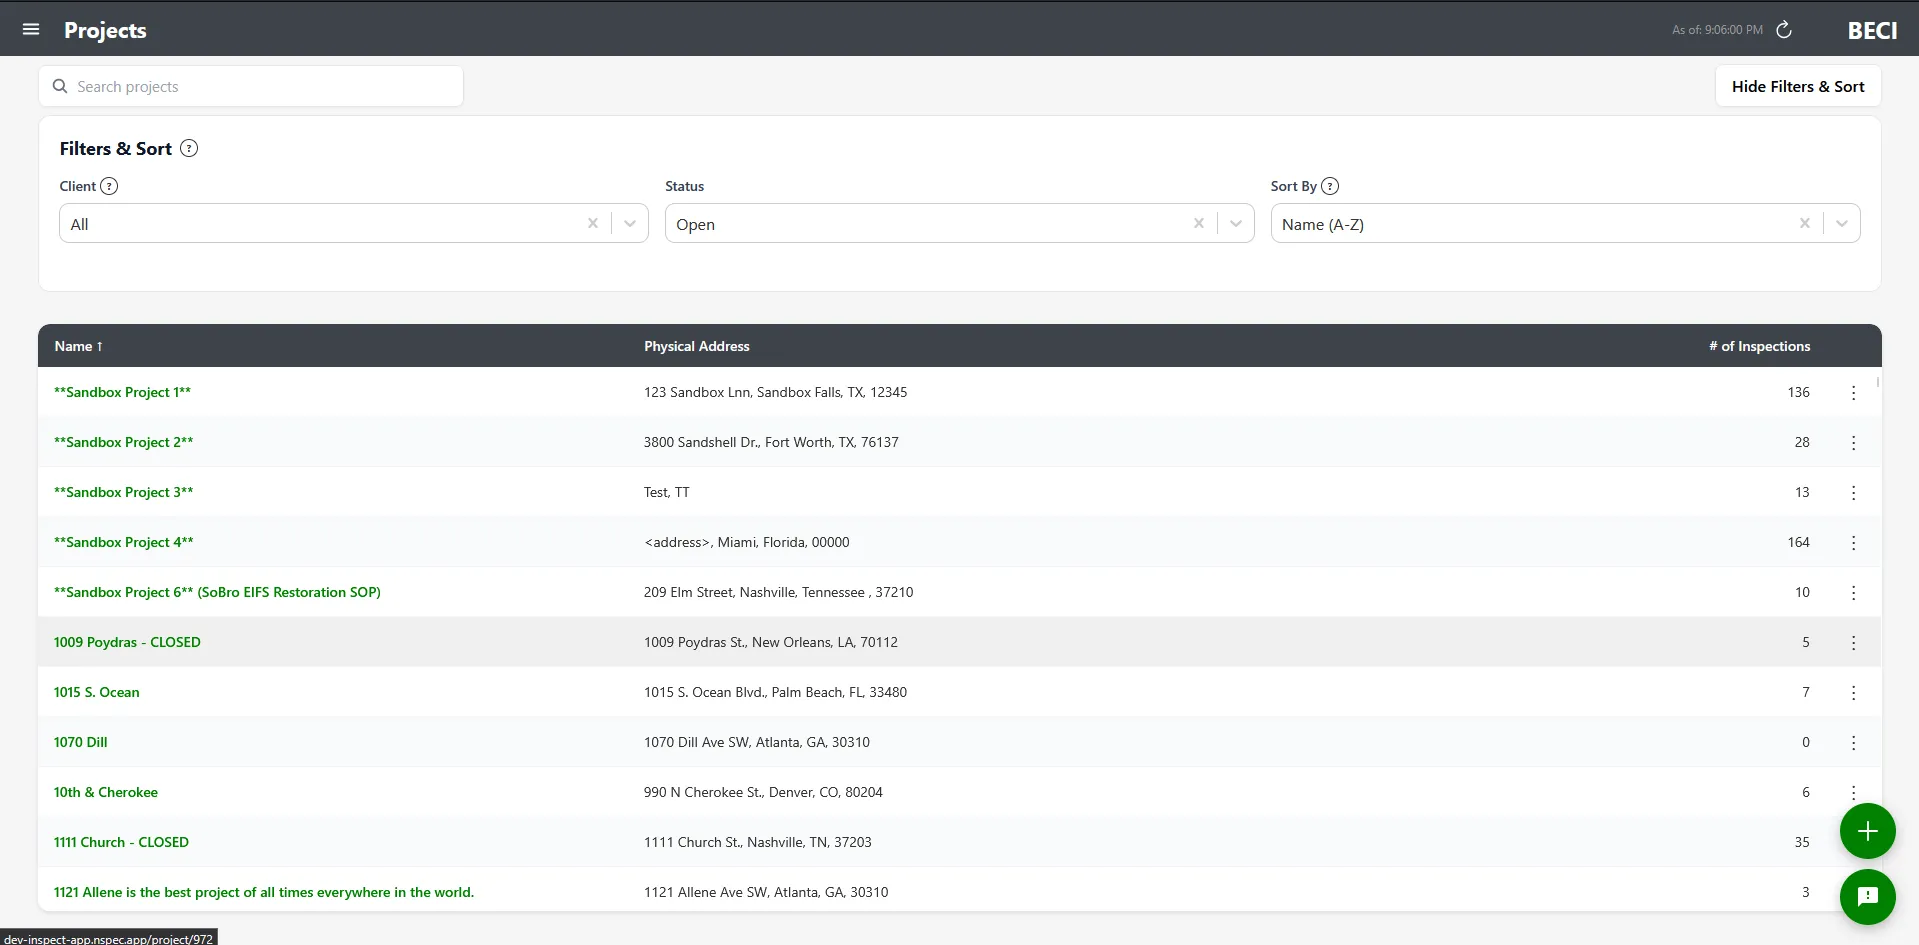
The Projects List
Section titled “The Projects List”The Projects screen shows every project you have access to. The table has three columns:
| Column | What it shows |
|---|---|
| Name | Project name. Closed projects show a “CLOSED” badge. |
| Physical Address | The project site address |
| # of Inspections | How many inspections have been created for this project |
Search and filter
Section titled “Search and filter”- Search bar — Type to filter projects by name
- Show Filters & Sort — Click to expand the filter panel
- Client filter — Show only projects for a specific client
- Status filter — Open (default), Closed, or All
- Sort options — Name, Address, or # of Inspections (each A-Z and Z-A or Low-High and High-Low)
Creating a Project
Section titled “Creating a Project”See Your First nSpec Project for the full walkthrough. The short version:
- Click the + Add project floating action button in the bottom-right
- The Create New Project modal opens
- Fill in the required fields and any optional details
- Click Save
Required fields
Section titled “Required fields”| Field | Notes |
|---|---|
| Project Name | Up to 200 characters |
| Office | Pick from the office list |
| Supervisor | Active supervisors only |
| Client | Locked after creation — you can’t reassign a project to a different client later |
| Starting Visit # | Defaults to 1. Locked after creation. |
| Disputes Email | Must be a valid email format |
Optional fields
Section titled “Optional fields”- Client Division — If the client has divisions configured, pick the relevant one
- Procore Project — Link to a Procore project (if your role has the Enterprise Procore Company permission and the client has a Procore Company ID)
- Address details — Physical Address, City, State, Zip Code
- Code — Internal project code
- Field Report Prefix — Prefix used in field report numbering
- Consultants Project Number — Reference number from a third-party consultant
- Notes — Free-text notes about the project
- Building Options / Floor Options — Configure the building and floor structure that inspectors can choose from when adding observations
- Primary Rep Name — Your main contact at the client
- Partner Project Number / State Project No — External reference numbers
- Contract Completion Date — Toggle the checkbox and pick a date to track project completion
- Project Photo — Upload an image to identify the project visually
- Project Contacts — Multiple individual contacts associated with this project
- Distribution List — Email recipients for automated reports and notifications. See Distribution Lists.
- PlanGrid URL — If your tenant has PlanGrid enabled
Opening a Project
Section titled “Opening a Project”- On the Projects screen, click the project row to open it
- You’re taken to the project inspection screen, which shows the list of inspections inside the project
Editing a Project
Section titled “Editing a Project”- On the Projects screen, click the action menu (three dots) on the project row
- Click Edit
- The Edit Project modal opens with all current values pre-populated
- Update any editable fields
- Click Save
Closing and Reopening a Project
Section titled “Closing and Reopening a Project”When a project is finished, close it instead of deleting it. Closed projects are hidden from the default Projects view but kept in the database along with all their inspections.
Closing a project
Section titled “Closing a project”- Open the Edit Project modal
- Click the Close button at the top of the modal
- Confirm in the dialog that says: “Are you sure you want to close this project? Closed projects will be hidden by default.”
Reopening a project
Section titled “Reopening a project”- On the Projects screen, change the Status filter to “Closed” or “All” so closed projects appear
- Open the closed project’s edit modal
- Click Reopen at the top of the modal
Reopening doesn’t require confirmation — the project is immediately active again.
Deleting a Project
Section titled “Deleting a Project”- On the Projects screen, click the action menu (three dots) on the project
- Click Delete
- Confirm in the dialog: “Are you sure you want to delete this project? This action cannot be undone.”
You need the Delete Projects permission for this option to be visible.
Project Contacts
Section titled “Project Contacts”Project contacts are individual people associated with a project — site managers, client representatives, subcontractors, etc. They’re stored on the project itself and can be referenced in reports and distribution lists.
- Open the project edit form
- Scroll to the Project Contacts section
- Click to add a new contact and fill in name, email, and phone
- To remove a contact, click the delete button on its row
- Save the project
Building and Floor Options
Section titled “Building and Floor Options”Building Options and Floor Options control which building and floor values inspectors can choose when creating observations. You configure these on the project so the dropdowns reflect the actual structure of the site instead of generic placeholders.
These are configured in the Edit Project modal. The exact format depends on how your administrator structured them — typically a list of building names and floor names that should appear in the observation form.
Permissions Required
Section titled “Permissions Required”| Action | Permission |
|---|---|
| View the Projects screen | View Projects |
| Create or edit projects | Add/Edit Projects |
| Delete projects | Delete Projects |
| Link projects to Procore | Enterprise Procore Company |
Troubleshooting
Section titled “Troubleshooting”The Projects screen is empty
Section titled “The Projects screen is empty”Solutions:
- Check the Status filter — if it’s set to “Open”, any closed projects are hidden
- Check the Client filter — make sure you haven’t filtered to a client with no projects
- Refresh the page
I don’t see the Add project button
Section titled “I don’t see the Add project button”Solutions:
- You need the Add/Edit Projects permission. Ask your administrator.
- Procore tenants don’t have a separate Add project button — projects are pulled from Procore via the Refresh Projects flow
I can’t find a project I closed
Section titled “I can’t find a project I closed”Solutions:
- Open the filters and change Status to “Closed” or “All” — closed projects are hidden by default
- Search by name in the search bar to confirm it still exists
I need to change the client on an existing project
Section titled “I need to change the client on an existing project”Solutions:
- You can’t. The Client field is locked after creation. Delete the project and recreate it under the correct client (you’ll lose any inspections in the old project).