
Managing What's Happening
This guide covers writing, publishing, and retiring What’s Happening announcements, and maintaining the company calendar.
Accessing the Admin Panel
Section titled “Accessing the Admin Panel”- Open What’s Happening — from the Apps button in the header, or from its card on your Home screen.
- Click Manage announcements in the page header. There is no Admin tab — the action lives in the platform header bar, and only administrators see it.
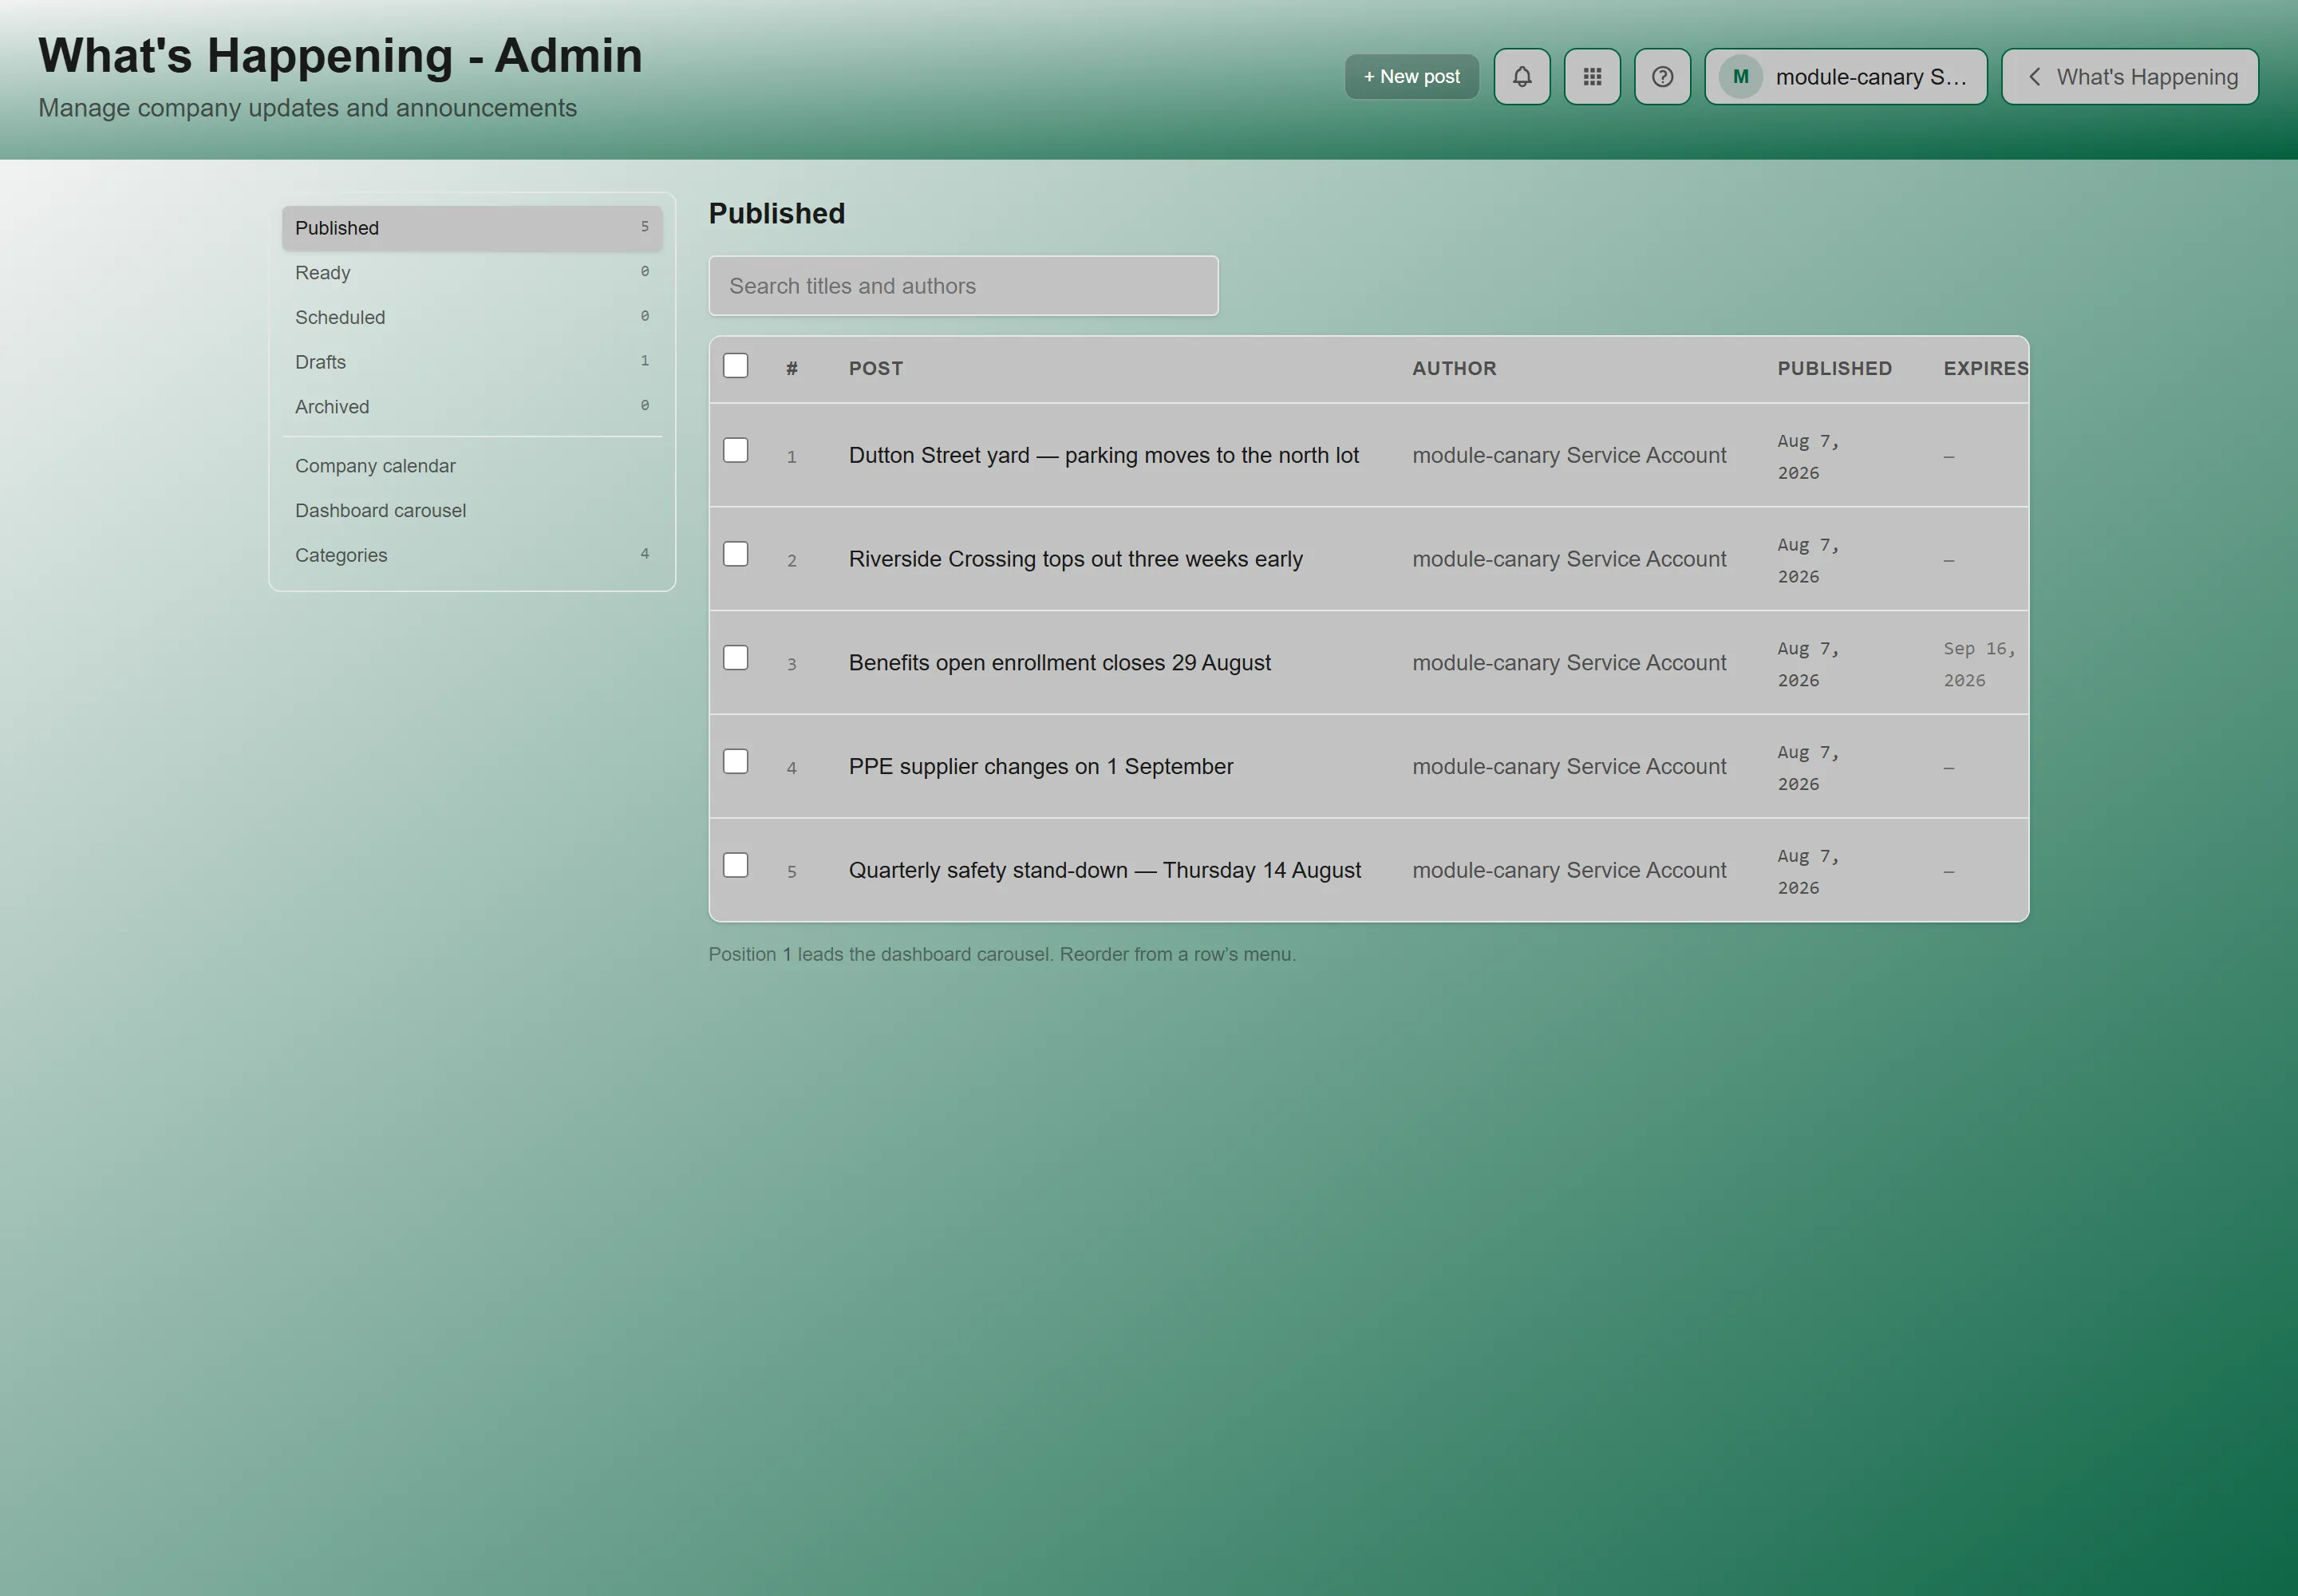
The admin view shows all announcements — both published and drafts — with controls for creating, editing, reordering, and archiving posts.
The Admin Panel’s Six Sections
Section titled “The Admin Panel’s Six Sections”The panel is split into two groups: content states, each with a live count, and configuration.
| Section | What it holds |
|---|---|
| Published | Live announcements, visible to everyone. Their order here is the rotation order of the dashboard carousel — position 1 leads. |
| Ready | Finished and approved, but not yet visible. A staging state between draft and published: the writing is done and someone has signed off, and you publish when the timing is right. |
| Drafts | Still being written. Not visible to anyone but administrators. |
| Archived | Retired from the feed but kept, so nothing is lost by taking a post down. |
| Company calendar | Where you maintain the pay schedule, holidays, and company events that appear on the Company Calendar page and its widget. |
| Dashboard carousel | How fast the Home screen carousel advances. See below. |
Dashboard Carousel
Section titled “Dashboard Carousel”The carousel is the What’s Happening widget on the Home screen. It shows one published announcement at a time, and position 1 in the Published list leads.
The only setting is Time on each announcement — a slider from 2 to 30 seconds, saved for the whole organization. Click Save to apply it.
Why the Feed and the Carousel Disagree
Section titled “Why the Feed and the Carousel Disagree”These are two different orderings, on purpose:
- The carousel follows the order you curated in the Published list.
- The What’s Happening page is strictly chronological, newest first, and ignores your ordering.
So reordering the Published list changes the carousel and leaves the feed alone. Both are behaving correctly when they disagree.
Creating an Announcement
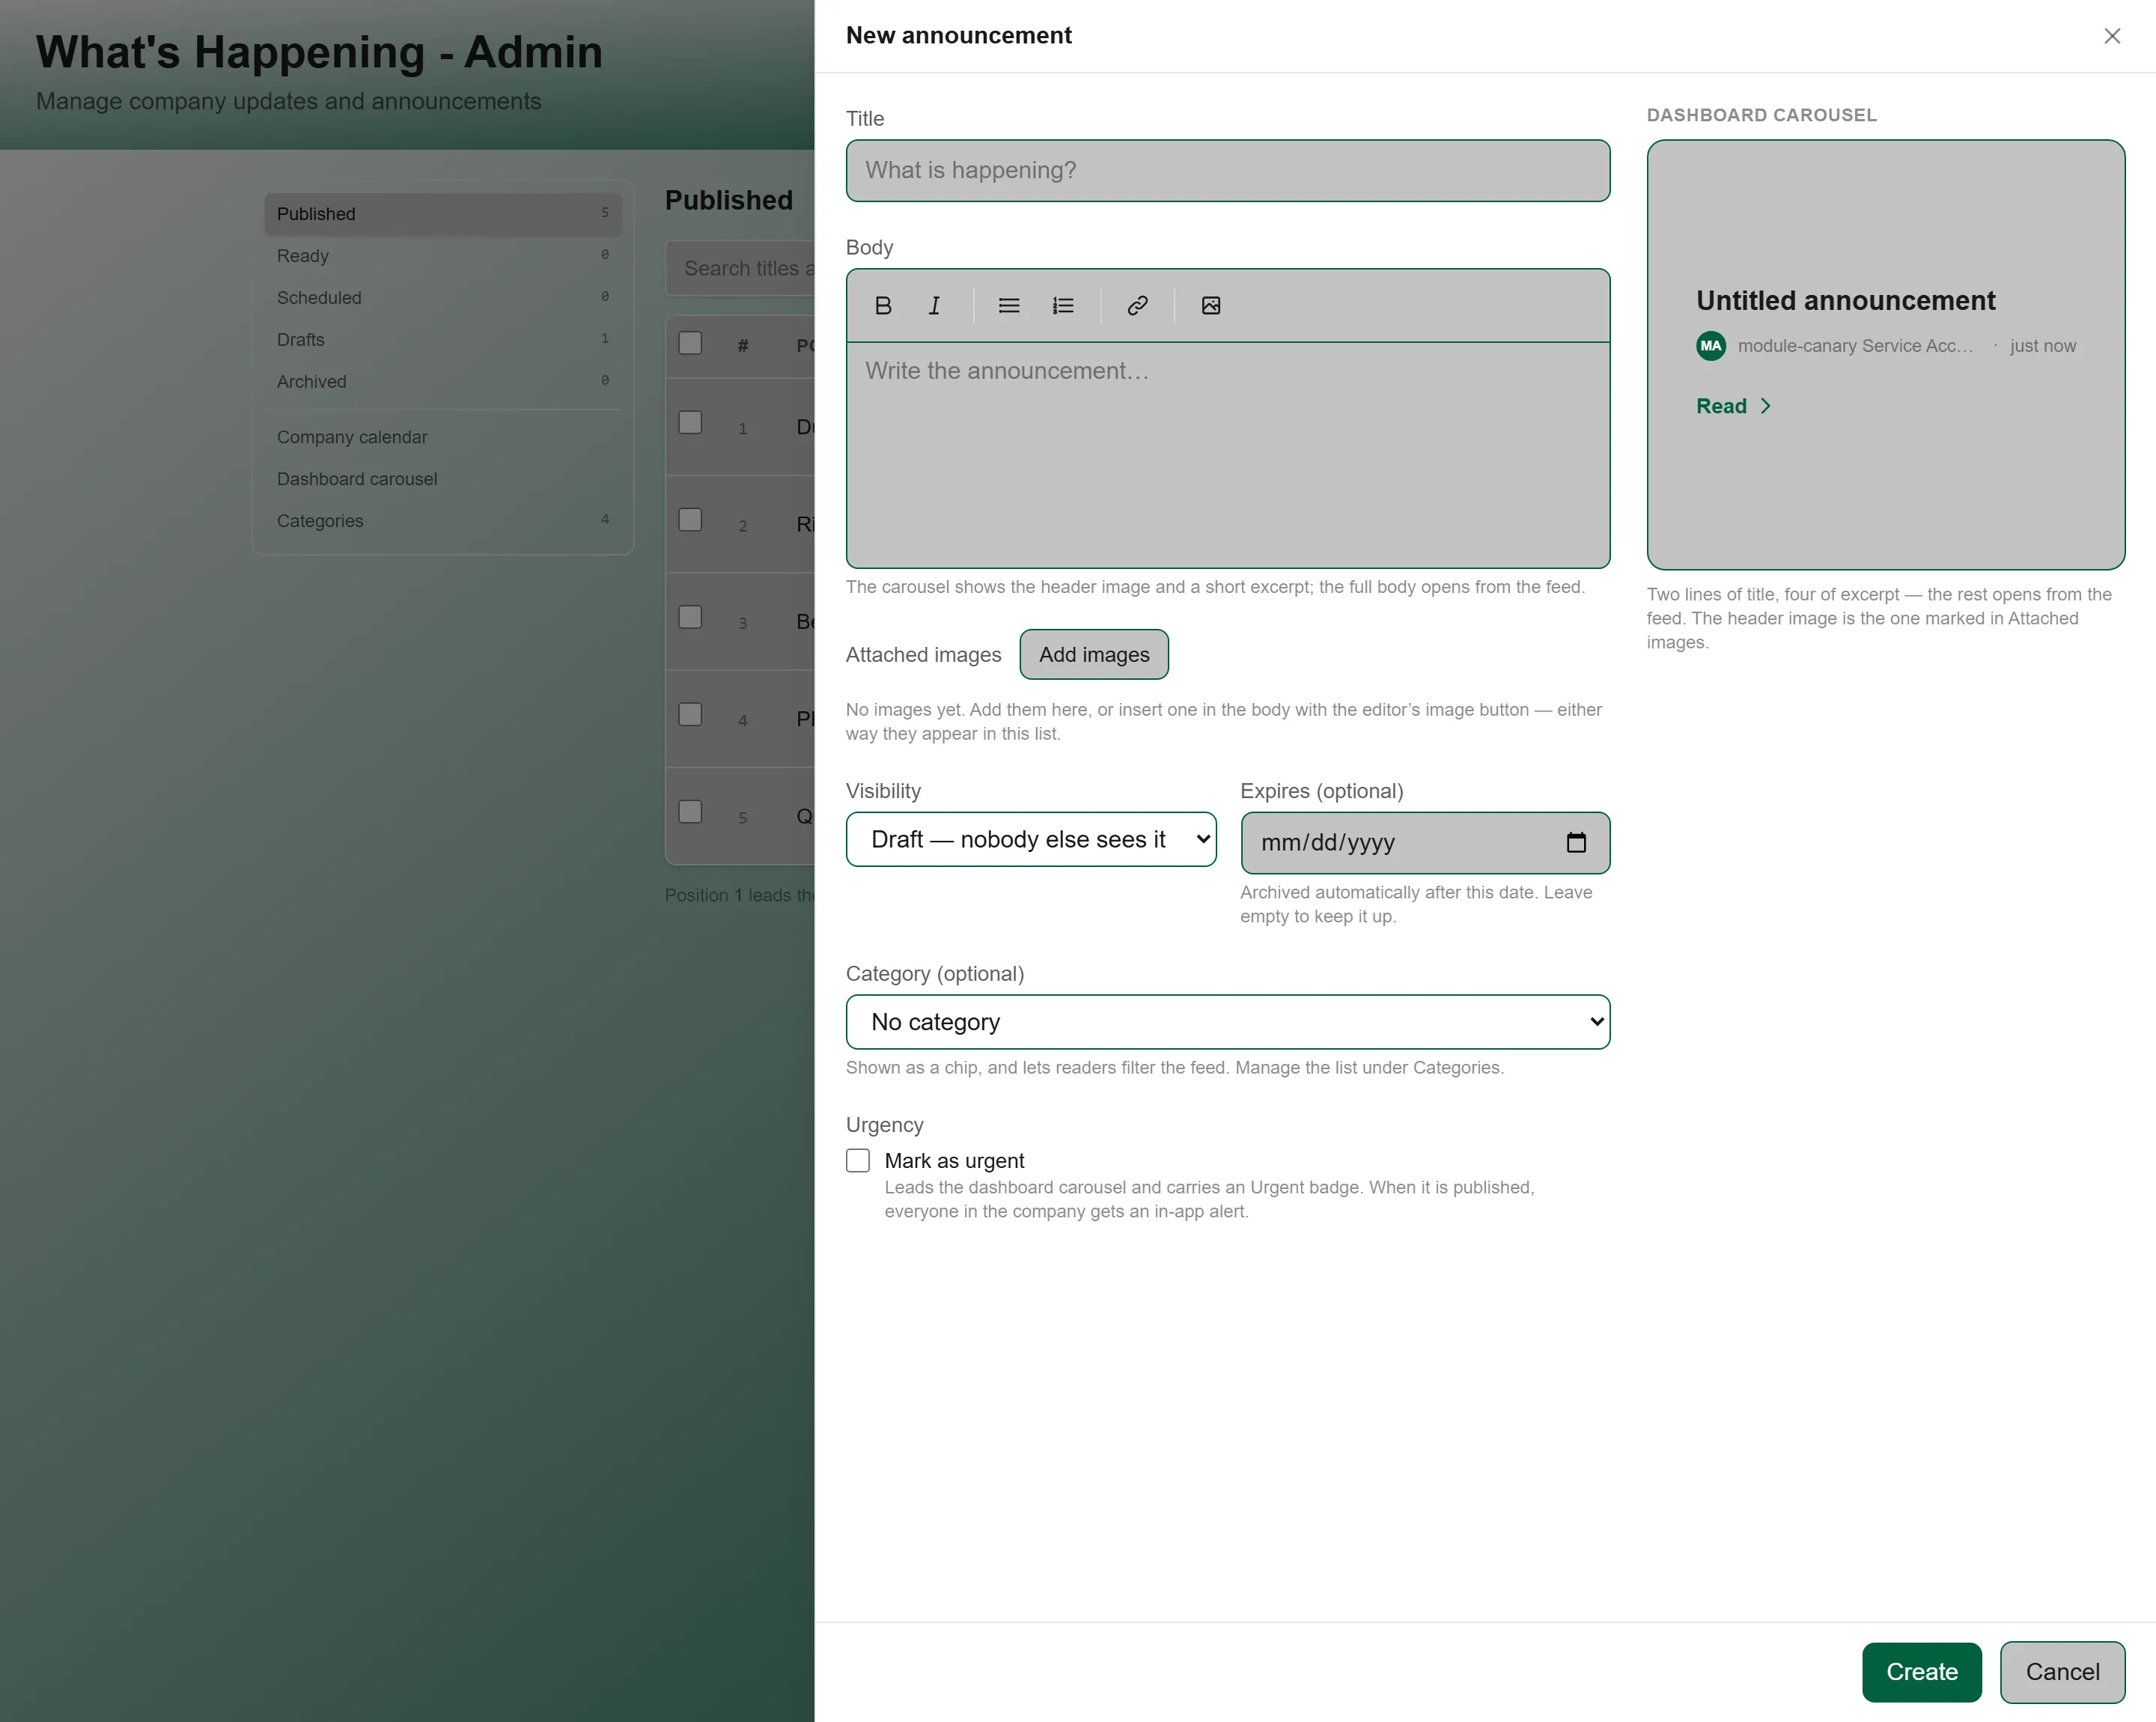
Section titled “Creating an Announcement”- From the Admin panel, click Create or the + button.
- Fill in the announcement fields (see below).
- Click Publish to make it visible or save as a draft.
Announcement Fields
Section titled “Announcement Fields”| Field | Description | Required |
|---|---|---|
| Title | The headline displayed at the top of the announcement. Keep it concise and informative. | Yes |
| Content | The body of the announcement. Supports rich text formatting (see below). | Yes |
| Images | Attach one or more photos or graphics. Images appear in the announcement alongside the content. | No |
| Expiration Date | Optional date when the announcement will automatically be removed from the employee feed. Useful for time-sensitive posts. | No |
| Visibility | Who can see the post. Draft is private to administrators — the dropdown spells it out as “Draft — nobody else sees it”. Published puts it in the employee feed. There are two further states an announcement can hold, Ready and Archived, and the admin list counts each of them separately. | Yes |
| Category | Shows as a chip on the announcement and lets readers filter the feed by it. Defaults to No category. The list of categories is managed separately, under Categories in the left rail. | No |
| Mark as urgent | Leads the dashboard carousel and adds an Urgent badge. Publishing an urgent announcement also alerts everyone in the company — see the warning below. | No |
Rich Text Formatting
Section titled “Rich Text Formatting”The content editor supports full rich text formatting so you can create professional-looking announcements:
- Bold and italic text
- Bulleted and numbered lists
- Hyperlinks to external resources
- Embedded images within the content body
- Headings and text hierarchy
Attaching Images
Section titled “Attaching Images”Add visual content to make announcements more engaging:
- Click the image upload area or drag and drop files.
- Select one or more images from your device.
- Images are automatically uploaded and processed.
- Reorder or remove images before publishing.
Images are stored securely in the cloud and automatically optimized for display across all devices.
Managing Existing Announcements
Section titled “Managing Existing Announcements”Editing an Announcement
Section titled “Editing an Announcement”- From the Admin panel, find the announcement you want to edit.
- Click on the post or the Edit button.
- Modify any fields — title, content, images, expiration, or visibility.
- Click Save to apply changes.
Changes to published announcements are visible to employees immediately after saving.
Controlling Visibility
Section titled “Controlling Visibility”Each announcement has a visibility status that determines whether employees can see it:
| Status | Behavior |
|---|---|
| Published | Visible to all employees in the What’s Happening feed |
| Draft | Only visible in the Admin panel — employees cannot see it |
You can toggle visibility at any time. This is useful for preparing announcements in advance or temporarily hiding a post while you update it.
Reordering Announcements
Section titled “Reordering Announcements”Control the display order of announcements in the employee feed:
- From the Admin panel, use the drag handles on each announcement.
- Drag announcements up or down to change their order.
- The new order is saved automatically.
Tip: Pin important announcements to the top of the feed so employees see them first, regardless of when they were published.
Archiving Announcements
Section titled “Archiving Announcements”Archive announcements to remove them from the employee feed while keeping them for reference:
- From the Admin panel, find the announcement.
- Click Archive (or toggle visibility to Draft).
- The announcement is hidden from employees but remains in the admin list.
Archived posts can be republished later if needed.
Deleting Announcements
Section titled “Deleting Announcements”To permanently remove an announcement:
- From the Admin panel, find the announcement.
- Click Delete.
- Confirm the deletion.
Managing the Calendar
Section titled “Managing the Calendar”The company calendar is managed from the Admin panel and displays important dates visible to all employees.
Updating Calendar Events
Section titled “Updating Calendar Events”- Navigate to What’s Happening Admin.
- Click the Calendar section.
- Add, edit, or remove calendar entries.
- Changes are immediately visible to all employees.
Common Calendar Entry Types
Section titled “Common Calendar Entry Types”| Type | Examples |
|---|---|
| Pay Schedule | Pay period end dates, paydays |
| Company Holidays | Office closures, observed holidays, floating holidays |
| Events | All-hands meetings, training sessions, team events |
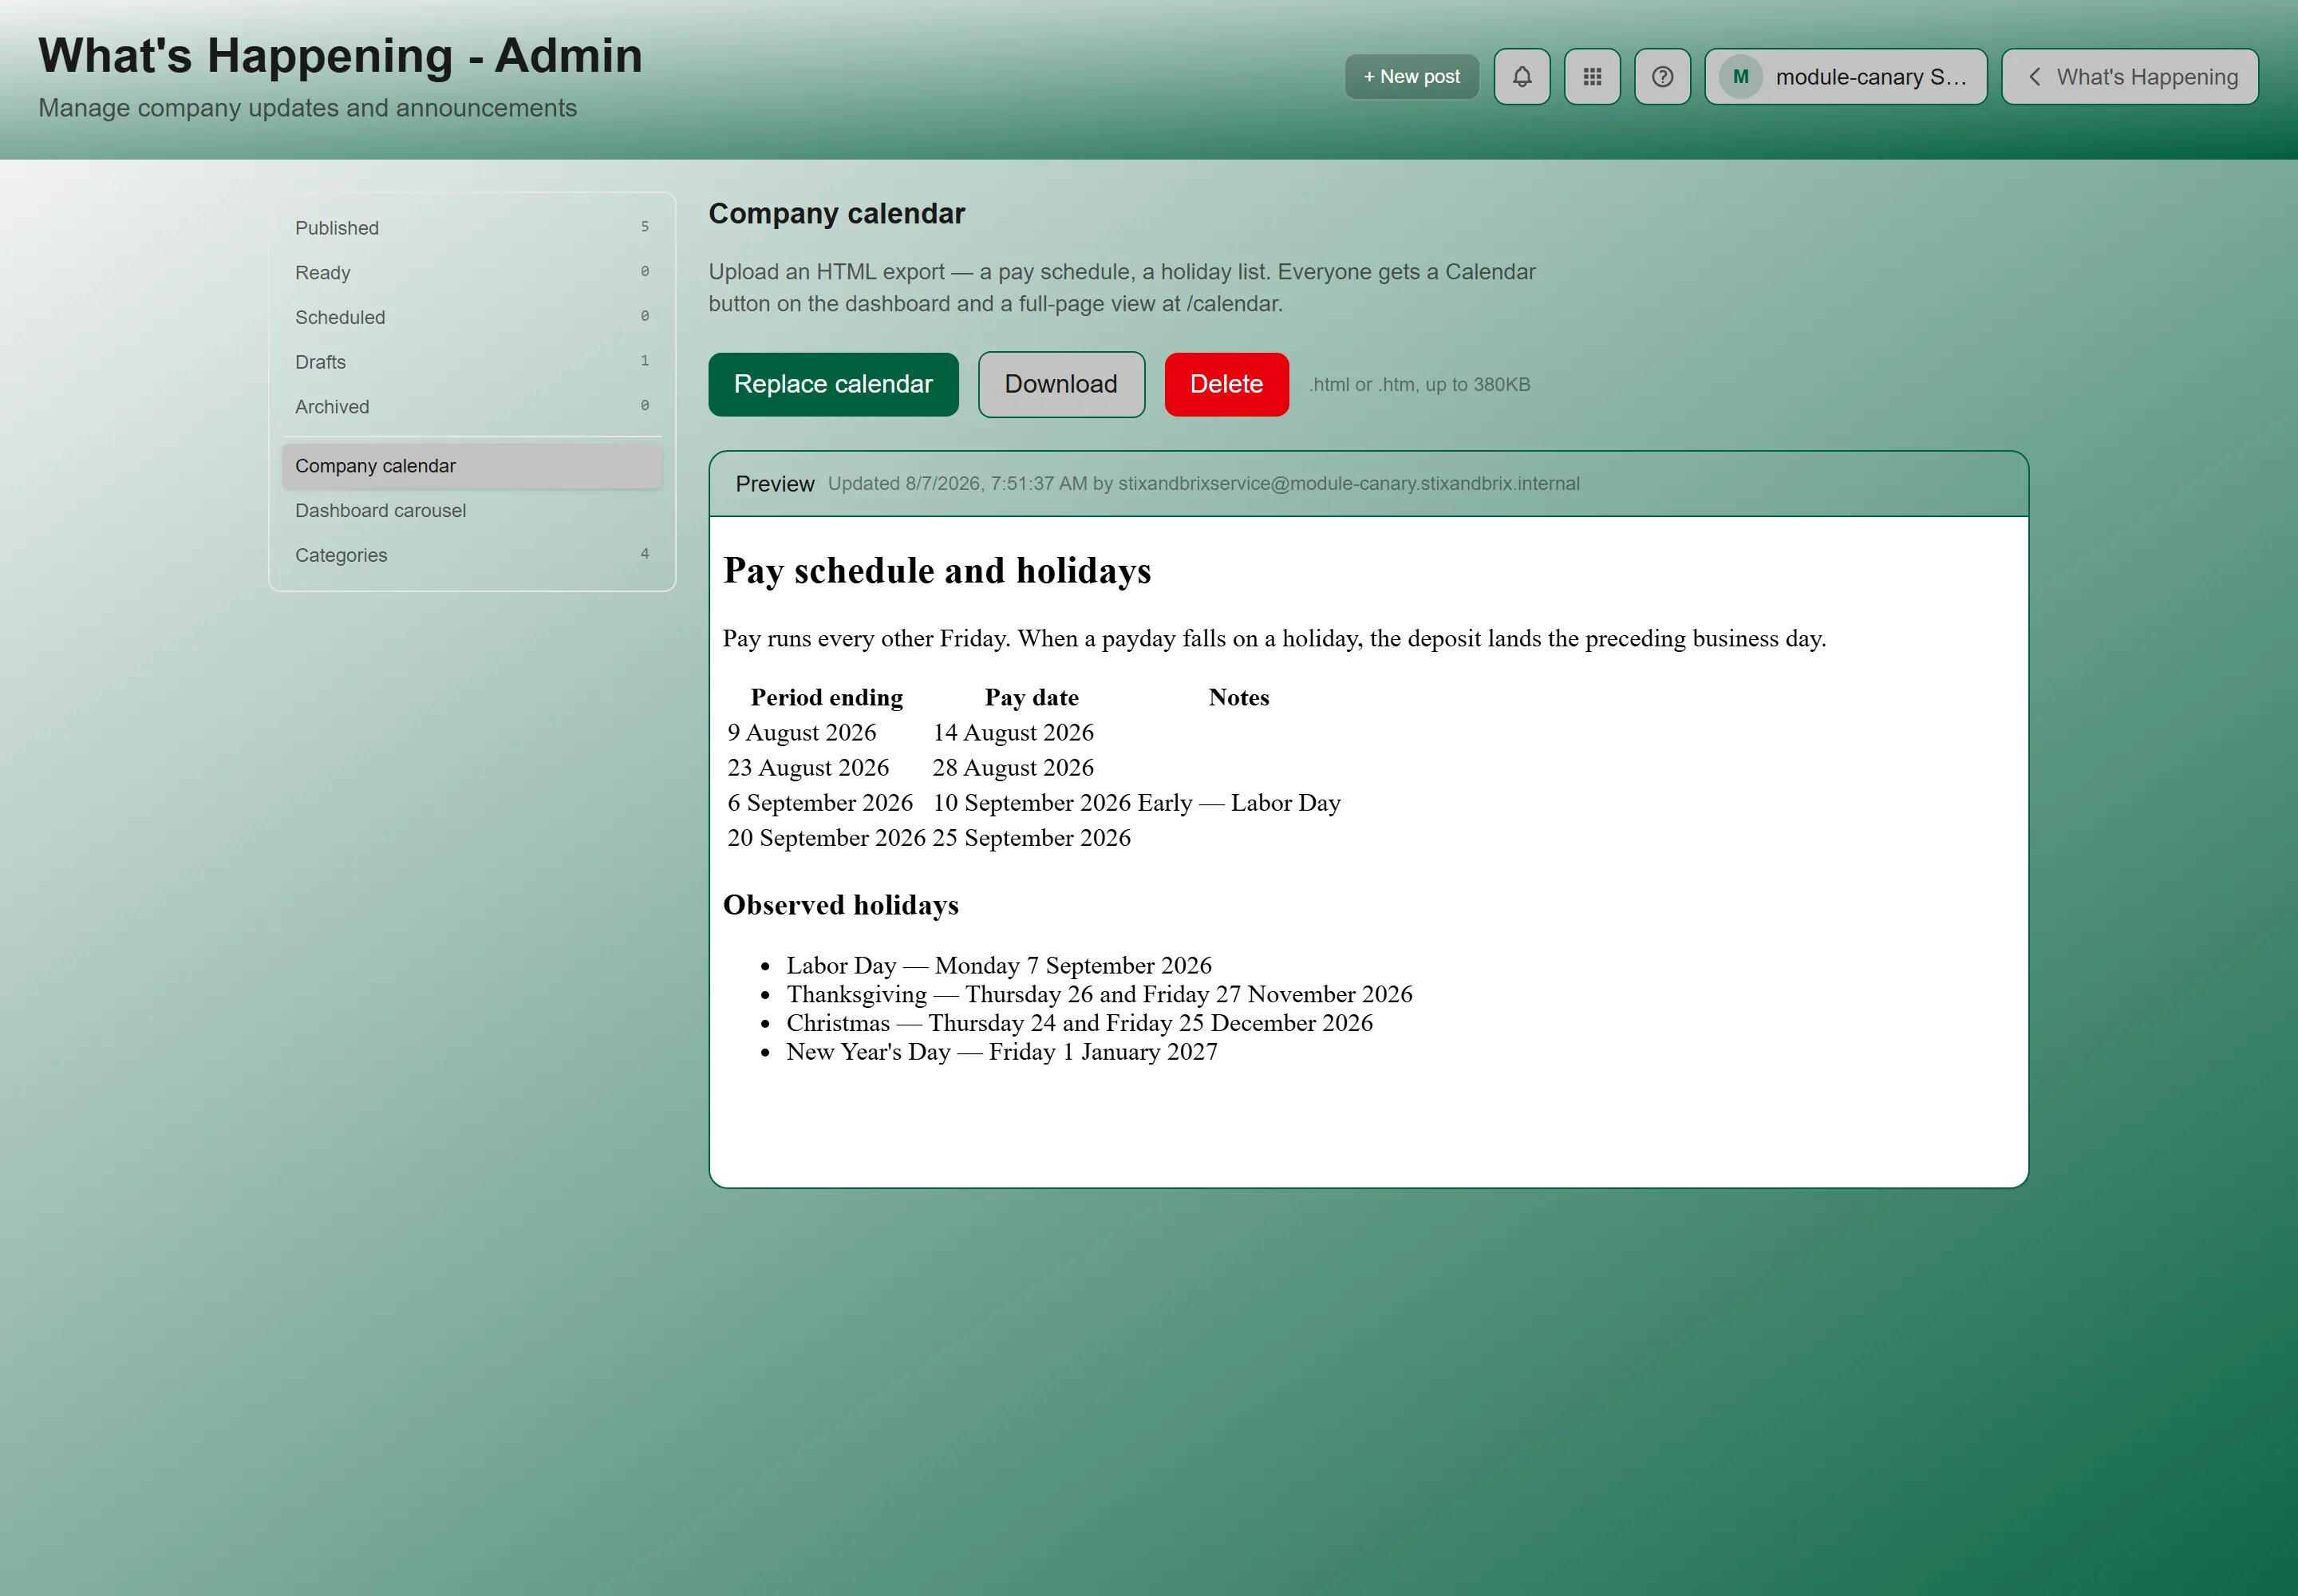
Tip: Upload the full-year calendar at the beginning of each year so employees can plan ahead.
How Expiration Works
Section titled “How Expiration Works”When you set an expiration date on an announcement:
- The post remains visible in the employee feed until the expiration date
- On the expiration date, the post is automatically removed from the feed
- The post is still accessible in the Admin panel for reference
- You can remove or change the expiration date at any time
Use expiration dates for time-sensitive content like enrollment deadlines, event reminders, or temporary policy announcements.
Content Tips for Effective Announcements
Section titled “Content Tips for Effective Announcements”- Lead with the key information — Put the most important details (dates, deadlines, actions required) at the top
- Use descriptive titles — “Open Enrollment Starts Feb 15” is better than “Important Update”
- Include images — Posts with photos or graphics get significantly more engagement
- Keep it scannable — Use bullet points, bold key information, and short paragraphs
- Set expiration dates — Prevent outdated posts from cluttering the feed
- Use links — Link to detailed documents, sign-up forms, or external resources instead of including everything in the post
Troubleshooting
Section titled “Troubleshooting”I finished an announcement and nobody can see it
Section titled “I finished an announcement and nobody can see it”Solutions:
- Check the Ready section. An announcement sitting in Ready is complete and deliberately invisible — it still has to be published.
- Check Drafts, which only administrators can see.
- Check the Expiration Date. An expired announcement is archived automatically and drops out of the employee feed.
A published announcement is missing from the Home widget
Section titled “A published announcement is missing from the Home widget”Solutions:
- The carousel shows at most 10 announcements. If you have more than ten published, the eleventh will not appear in the rotation — the full list is always on the What’s Happening page.
- Reorder the Published list to move it into the top ten; position 1 leads.
The feed and the carousel are in different orders
Section titled “The feed and the carousel are in different orders”Solutions:
- Both are correct. The carousel follows the order you curated in Published; the What’s Happening page is strictly chronological, newest first, and ignores that order.
- Reordering the Published list changes the carousel only. There is no way to reorder the page itself.
A colleague says the carousel is not rotating
Section titled “A colleague says the carousel is not rotating”Solutions:
- Anyone can pause the rotation from the widget, and that choice sticks on their own device. Nothing is wrong with the announcement.
- If it is rotating too fast or too slow for everyone, change Time on each announcement in Dashboard carousel — a slider from 2 to 30 seconds, saved for the whole organization.
Related Articles
Section titled “Related Articles”- What’s Happening — Employee guide to reading announcements and using the calendar
- Branding and Administration — Configure your organization’s portal