
Tracking Assets with Inventory
Inventory tracks the equipment your company owns — where each item is, who has it, and what has happened to it. You can work from your desk or scan the QR label on the item itself. This article covers finding items, moving them through their statuses, and using labels in the field.
Finding Your Way Around
Section titled “Finding Your Way Around”Open Inventory from the app launcher. Two pages are yours:
- Dashboard — the state of everything you can see
- Inventory — the searchable list of items
Administrators also see Admin, covered in Administering Inventory.
The Dashboard
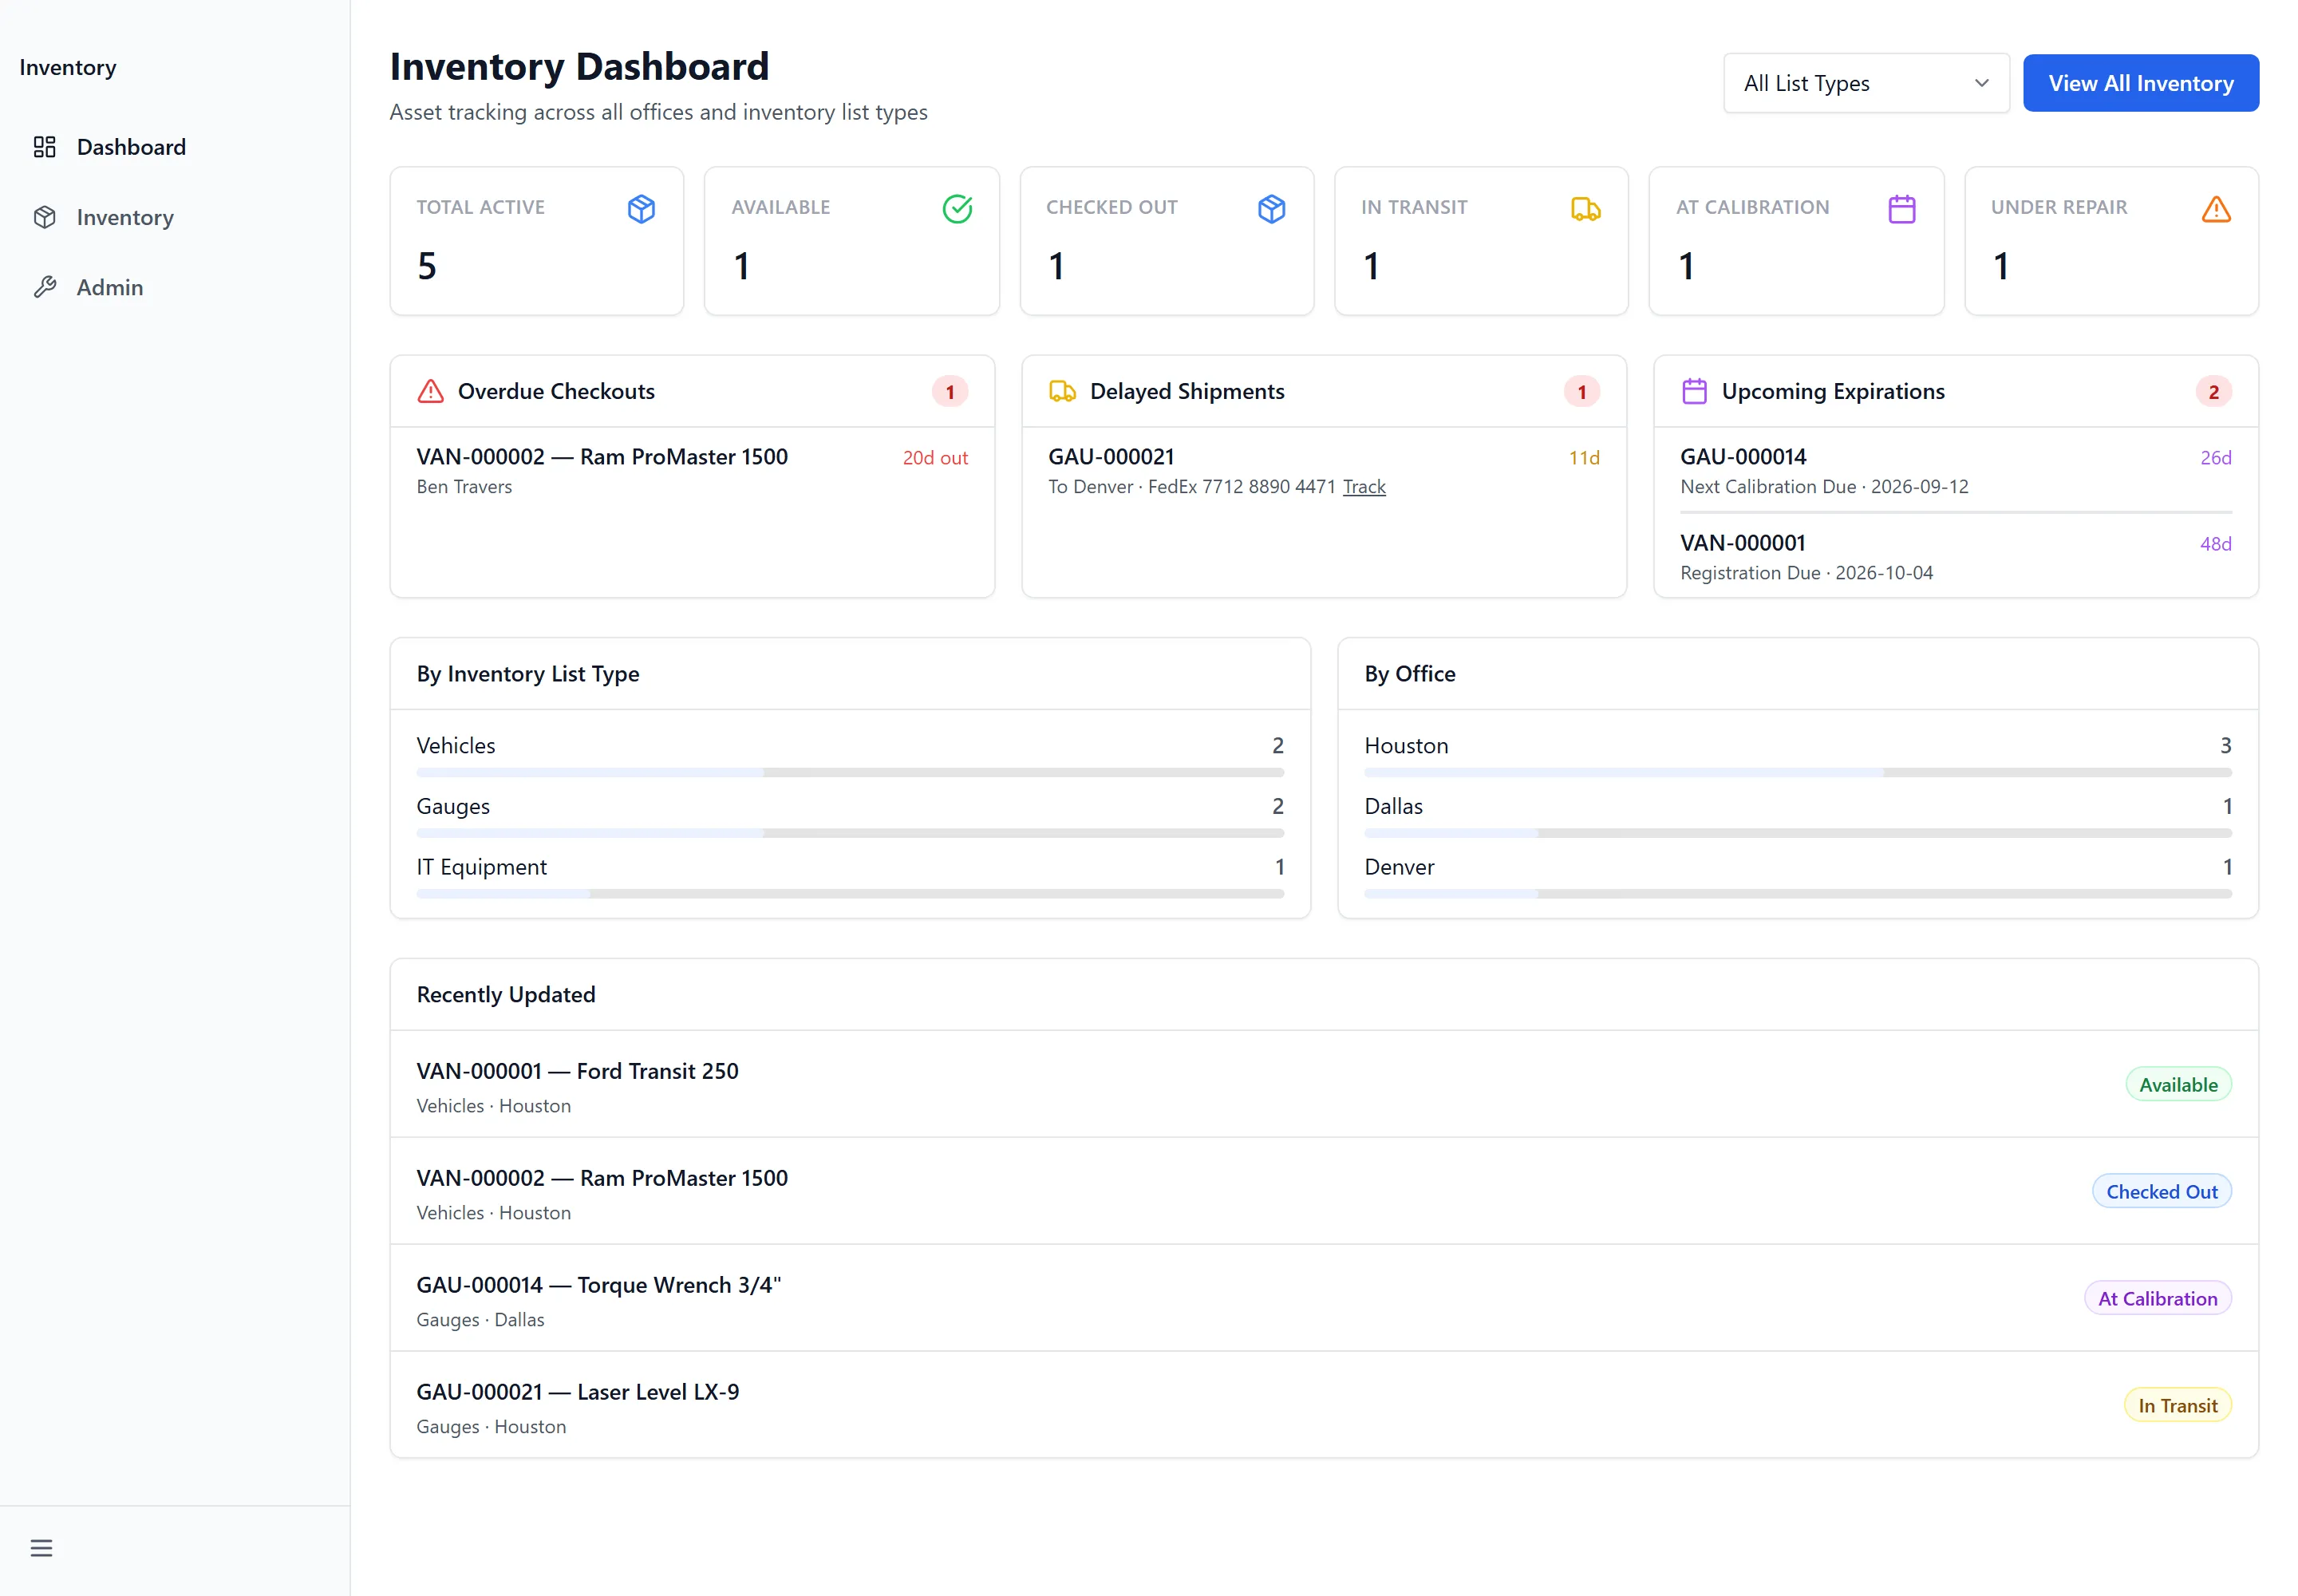
Section titled “The Dashboard”Inventory Dashboard opens on six counts — Total Active, Available, Checked Out, In Transit, At Calibration and Under Repair — followed by three things that need attention:
- Overdue Checkouts — items out longer than expected
- Delayed Shipments — items in transit too long
- Upcoming Expirations — dates coming up, such as calibration or registration
Below those, By Inventory List Type and By Office break the totals down, and Recently Updated lists the latest changes. Narrow the whole page with the list-type filter, or select View All Inventory to jump to the list.
Finding an Item
Section titled “Finding an Item”Inventory lists everything you can see, with Asset #, Name, Type, Status, Office, Assigned To and a QR column.
Filter by Type, Office or Status — those apply as soon as you choose them. The Search box, which matches on “Name, asset #, serial…”, does not: press Enter or select Search to apply it. With nothing matching, the list reads “No items found”.
Adding an Item
Section titled “Adding an Item”- Select New Item.
- Choose the Inventory List Type — this decides which fields the item has.
- Enter the Item Name and choose an Office.
- Optional: set Assigned To, fill in the type’s own fields, and add Notes.
- Select Create Item.
The asset number is generated for you from the list’s prefix — a list with the prefix
VAN produces VAN-000001. That number is what the QR label encodes.
Item Details
Section titled “Item Details”Select a row to open the item. Details shows Asset Information — the asset number, name, type, status, office, who it is assigned to, its location and notes — plus whatever fields its list type defines. A checked-out item also shows who has it and when it is due back; an item in transit shows where it is going, the carrier and the tracking number.
QR opens the item’s label, and Edit changes its details.
Moving an Item Through Its Statuses
Section titled “Moving an Item Through Its Statuses”Actions offers only what makes sense for the item’s current status. These are the actions available out of the box:
| Action | Available when the item is | What it does |
|---|---|---|
| Check Out | Available | Assigns it to someone and sets an expected return date. |
| Check In | Checked Out, Lost | Clears the assignment and returns it to Available. |
| Ship to Office | Available, Checked Out | Needs a destination office, carrier and tracking number. |
| Receive at This Office | In Transit | Ends the shipment and re-homes the item. |
| Send to Calibration | Available | Optionally records when calibration is next due. |
| Return from Calibration | At Calibration | Returns it to Available. |
| Mark Under Repair | Available | Takes it out of service. |
| Return from Repair | Under Repair | Returns it to Available. |
| Retire Item | Under Repair | Removes it from active inventory. |
Every action asks for confirmation and takes optional notes. Statuses are Available, Checked Out, In Transit, At Calibration, Under Repair, Retired and Lost.
Maintenance and Mileage
Section titled “Maintenance and Mileage”Lists set up for it — vehicles, typically — gain a Maintenance tab showing Current Mileage, Last Service and Next Service Due.
- Log Mileage records an odometer reading.
- Log Service records work done — the service type, the vendor, the cost, and when the next one falls due.
Everything logged appears under Service & Mileage History. If a vehicle has no Maintenance tab, its list type does not have maintenance tracking switched on; an administrator can enable it.
History
Section titled “History”History is the item’s full timeline — created, updated, checked out, checked in, shipped, received, sent for calibration or repair and returned, retired — each with who did it and when. Nothing is removed from it.
Scanning a QR Label in the Field
Section titled “Scanning a QR Label in the Field”This is the fastest way to work with an item you are standing next to.
Printing the label
Section titled “Printing the label”- Open the item and select QR.
- Select Print Label.
- Attach it to the item.
The panel says it plainly: “Print this label and attach it to the item — scanning it opens the check-in / check-out actions.”
What you can do from a scan
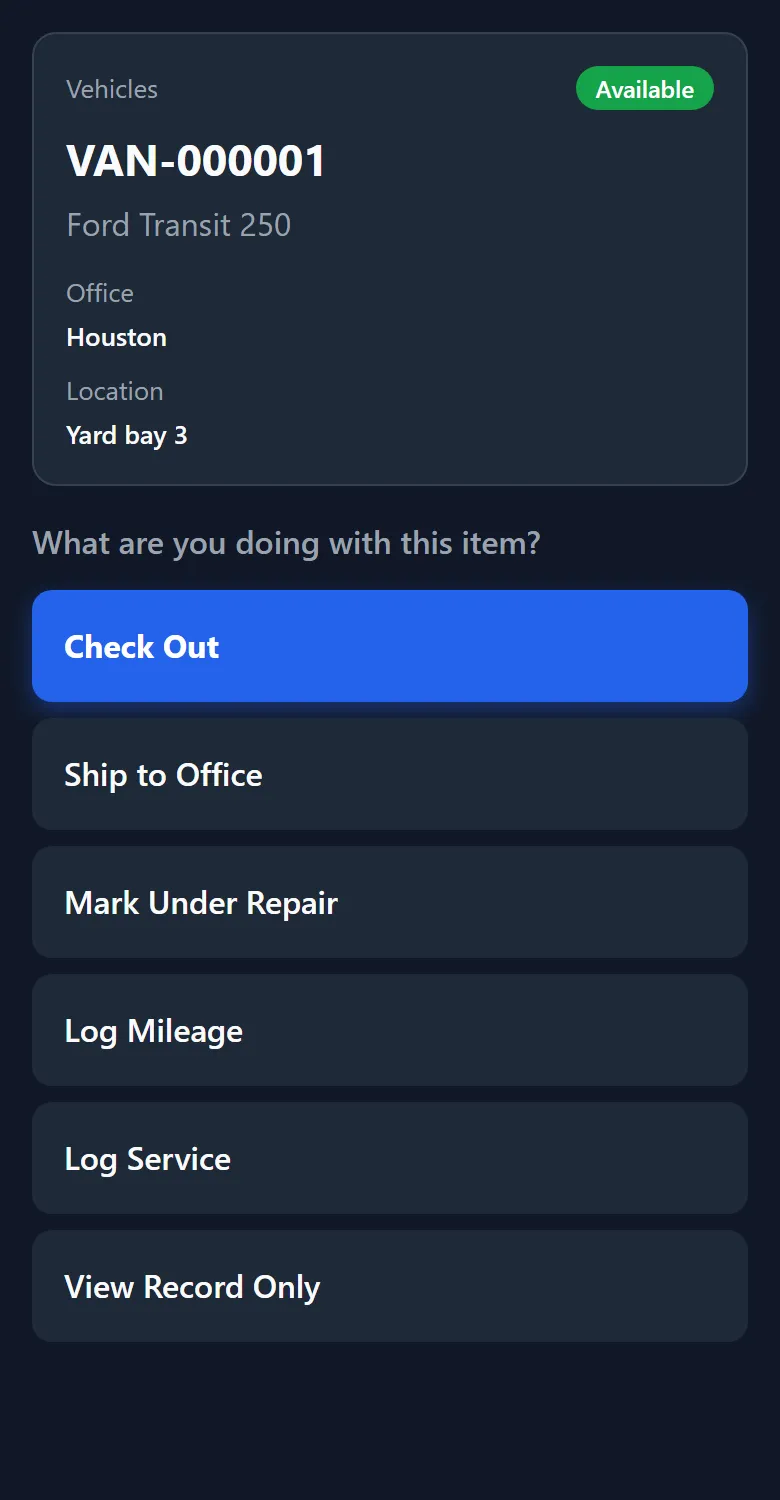
Section titled “What you can do from a scan”Scan the label with a phone camera. The page shows the item — its office, who has it, where it is, and any shipment — then asks “What are you doing with this item?” with a button for each action valid right now.
- Tap the action you want.
- Confirm, or fill in what it asks for.
- The page reports “Done!” and offers Scan Another.
Viewing an item this way does not require signing in; performing an action does. An unrecognised label shows Not Found.
Troubleshooting
Section titled “Troubleshooting”I can’t see a list my colleague can
Section titled “I can’t see a list my colleague can”Solutions:
- Lists can be restricted to particular groups. An unrestricted list is visible to everyone; once any group is assigned, only its members and administrators see it.
- Ask an administrator to add you to the group for that list.
The action I want isn’t there
Section titled “The action I want isn’t there”Solutions: there are three separate reasons, so check in order.
- The action does not apply to the item’s current status — Check Out only appears on an available item, and Retire Item only on one under repair.
- You have view access to that list but not manage access, so no actions appear at all.
- An administrator has not enabled that action for the list type. Actions are switched on per list.
There are no actions on any item
Section titled “There are no actions on any item”Solutions:
- On a newly set-up Inventory, the scan actions have not been loaded yet. An administrator needs to do that once — see Administering Inventory.
A scan says Not Found
Section titled “A scan says Not Found”Solutions:
- The label is for an item that no longer exists, or the code did not read cleanly. Try again in better light.
- Search the asset number in Inventory to confirm the item is still there.
Check Out says the item must be available
Section titled “Check Out says the item must be available”Solutions:
- Someone else already has it. Check the Assigned To column, or the item’s History to see who took it and when.
- Check it in first if it has been returned in reality but not in Inventory.
The page says a newer version is available
Section titled “The page says a newer version is available”Solutions:
- Select Refresh. Phones hold on to an old copy of the page, and the scan page sometimes reloads itself once to clear it.
A vehicle has no Maintenance tab
Section titled “A vehicle has no Maintenance tab”Solutions:
- Maintenance tracking is switched on per list type, not per item. Ask an administrator to enable it for that list.
Related Articles
Section titled “Related Articles”- Administering Inventory — Setting up lists, scan actions, statuses, offices and reminders
- Getting Access to Apps and Extensions — Start here if Inventory is missing or a list is not visible